Saturday, February 23, 2008

Honeyed Orange Blueberry Muffins

Add A Little Sunshine To Your Day!

While visiting one of my favorite blogs, Food Blogga, I noticed this delicious sounding recipe - Honeyed Orange Ginger Muffins (Quat, Optional). The creative and daring, Susan created this recipe using orangequats. I have never had nor seen an orangequat, but no problem because Susan made the recipe "quat-optional", substituting with naval oranges. One look at her luscious muffins and I knew I had to make some.

I altered the recipe a bit for a few reasons. One, like I said, I have never seen orangequats in my supermarket, so I used naval oranges as Susan suggests. Two, I had my Mom in mind when making this recipe and she loves the flavor of orange and blueberries, but does not like a spicy flavor and usually prefers her muffins with less sugar. So I substituted blueberries for the raisins and changed the minced ginger to half the amount of minced candied ginger. I also reduced amount of sugar and opted for organic unrefined sugar.

I think they came out great; very tasty and light. I don't know how it happened but I ended up with extra batter, so I made 10 mini muffins with the left-over batter. (Very dangerous, because they are very "pop-able", and I popped quite a few in my mouth without hesitation). Although, I didn't really feel that bad because these muffins are fairly low in fat, using canola oil and only one egg. Thanks for the inspiration Susan!

Honeyed Orange Blueberry Muffins

adapted from Food Blogga-Honeyed Orange Ginger Muffins (Quat, Optional)
2 cups all-purpose flour, plus 1 teaspoon reserved
1/2 cup, plus 1 tablespoon sugar
1 1/2 teaspoons baking powder
1/2 teaspoon baking soda
3/4 teaspoon salt
1/4 cup canola oil
1 egg, lightly beaten
3/4 cup freshly squeezed navel orange juice (about 2 oranges)
1/4 cup finely minced navel orange pulp
1 tablespoon navel orange zest (about 1 orange)
1 teaspoon candied ginger, minced
3 tablespoons honey
1 teaspoon pure vanilla extract
1 pint fresh blueberries

Place rack in center of oven and preheat to 350 degrees F. and set on convection, or 375 F. for conventional oven. Spray a 12 mold regular size muffin pan with cooking spray or use paper muffin liners.

In a large bowl, combine flour, sugar, baking powder, baking soda, and salt.

In a separate bowl, whisk together oil, egg, and juice. Add the orange pulp, orange zest, ginger, honey, and vanilla, and whisk until just combined. Add to the flour mixture and stir quickly until well combined. Toss blueberries in the reserved teaspoon of flour until evenly coated. Fold the blueberries into the batter. Spoon the batter evenly into the 12 molds. If you have extra batter, spoon into an additional muffin pan. (I made 10 mini muffins).

Bake for 12-15 minutes for regular sized muffins, and 8-10 minutes for mini muffins, or until the tops are golden and a cake tester inserted into the center of a muffin comes out clean. Transfer the pan to a rack to cool for 5 minutes before removing each muffin and placing on a wire rack to cool.

Wednesday, February 20, 2008

Peas and Proscuitto

Foolproof...

This is such a great recipe.
And who doesn't have frozen peas? It is quick and easy and delicious. You almost can't screw it up. I can assure of that because I thought I did and it still turned out good.

I knew I wanted to make this recipe, so I went out and bought the prosciutto. I had all the other ingredients needed for the recipe. So I thought.

Little did I know that the bag of peas in my freezer were nearly a year old. Well it was too late to abort; I had everything prepared up to the point of adding the peas. So I rinsed the peas under cold water and hoped for the best.

As I was cooking the peas, I got distracted with income tax stuff that I was trying to figure out. Well I started to hear popping and jumped up to find my peas starting to get dark brown.
I thought for sure the dish was ruined, but NO, it was actually still edible!

I can't wait to make it again with new peas and my undivided attention!


Peas and Proscuitto
by Giada De Laurentiis

2 tablespoons olive oil
3 shallots, chopped
2 garlic cloves, minced
Salt and freshly ground black pepper
1 (1-pound) bag frozen peas, thawed
4 ounces (1/8-inch-thick slices) prosciutto, diced
1/4 cup chopped fresh Italian parsley leaves


Heat the oil in a heavy large skillet over medium-low heat. Add the shallots, garlic, salt, and pepper, and saute until tender, about 1 minute. Add the peas and saute until heated through, about 5 minutes. Stir in the prosciutto and cook for 1 to 2 minutes. Add the parsley and remove from the heat. Season, to taste, with salt and pepper, and serve.

Mom's Chicken Marsala

Always Good!

One thing you can always count on in this uncertain world is Mom's cooking. This is one dish that my Mom always makes and it's always delicious. She has two versions: Chicken Marsala with Mushrooms and Chicken Marsala with Artichokes. The ingredients tend to change depending on what she has in the house. If she doesn't have mushrooms than she will make it with artichokes. Or if she ran out of marsala wine, then white wine or even vermouth will do. Sometimes she will use chicken breast cut into pieces or more commonly tenderloins.
And it amazes me that no matter what the change, it is always equally good!

Mom never really measures anything, so it was a little difficult to get the recipe on paper. But she did her best and now I offer it to all of you!

Mom's Chicken Marsala


1 lb. chicken tenderloins, cut in half
4-5 garlic cloves, sliced thin
1/2 cup mushrooms, preferably portobello or porcini, (but you could use button), sliced thin
1/4 cup flour
1/2 tsp. sea salt
1/4 tsp. pepper
1/2 tsp. salt-free all purpose seasoning
1/2 tsp. dried parsley, or 1 tsp. fresh, plus more for garnish
2-3 tbls. olive oil
1/3 cup marsala wine
1 can low-sodium chicken broth (preferably Swanson)
1/2 cup black olives, left whole or cut in half
1/2 cup green olives, left whole or cut in half

Add the flour, salt, pepper, all purpose seasoning, and parsley to a large zip lock plastic bag. Add the chicken and shake until all the chicken is coated.

Add the olive oil to a large pan over medium high heat; add garlic and brown them lightly, remove from pan and set aside. Next, add the mushrooms and cook for 2-3 minutes, remove from pan and set aside.

Remove any excess flour from the chicken; line them up in the pan so they are separated and quickly brown them on both sides.
Add back the garlic and mushrooms to the pan. Add the marsala and cook for a minute or two, until the alcohol burns off. Add the chicken broth, bring to a boil, lower the heat and simmer for about 25 minutes.

Add black and green olives and cook for an additional 10 minutes.

To thicken the sauce, add some of the leftover flour from the plastic bag to a pyrex measuring cup with 1 tablespoon cold water. Mix and add to the chicken; cook for 2-3 minutes more. Serve with noodles and top with fresh parsley.

Monday, February 18, 2008

Lightened-Up Classic Egg Salad

Totally Under-Rated!

Was there a food that you ate often as a kid, that at the time didn't thrill you, but as an adult you have grown to love? Well with me, one of those foods is egg salad.

We had it quite often when I was growing up and I didn't really care too much for it. I recently made it and could not believe how much I liked it. Actually, I can't wait to make it again.

I lightened up the recipe a bit by eliminating some of the yolks. You really don't miss them at all. I used regular mayo because the reduced-fat just does not compare. To compensate I used only 1/2 the amount and replaced the other 1/2 with yogurt.

So not only is this classic dish delicious, now it's healthy too!
You're Welcome... No, really. It's my pleasure!

Put it on a low-carb bagel and you'll think you're in heaven.

Lightened-Up Classic Egg Salad

1/8 cup mayonnaise
1/8 cup fat-free plain yogurt, drained over paper towels in sieve to remove excess liquid (at least 30 minutes)
2 teaspoons lemon juice
1 teaspoon dried minced onion
1/4 teaspoon sea salt
1/4 teaspoon pepper
7 hard-cooked eggs*, discarding 4 of the yolks
1/2 cup finely chopped celery

In medium bowl, stir together mayonnaise, lemon juice, onion, salt, if desired, and pepper until well blended. Slice one egg and reserve 4 center egg slices for garnish, if desired. Chop remaining eggs. Stir in chopped eggs and celery until evenly coated with dressing. Cover and chill to blend flavors. Garnish with reserved egg slices.

* For Perfectly Cooked Hard Boiled Eggs...from What's Cooking America

Bring your eggs to room temperature before cooking. If the egg has been stored in the refrigerator it can be warmed gently under a flowing hot tap water. By bringing the eggs to room temperature, they're much less likely to crack in the hot water. Also the temperature of the egg at the start of the cooking process will affect the cooking time. An egg that is at room temperature at the start of the cooking process will require about 1 minute less cooking time than eggs taken directly from the refrigerator.

Gently place the eggs in a single layer in a pan with enough cold water to cover eggs completely (approximately by 1 1/2 inches). If you have two or three layers of eggs stacked up in a small pot, they may cook unevenly. NOTE: Use a tall pan, and limit cooking to 2 dozen
eggs at a time.

Over high heat, bring water JUST to a rapid boil.

As soon as the water reaches a rapid boil, remove pan from heat and cover
egg pan tightly with a lid.

Set timer for 17 minutes for large eggs or 20 minutes for jumbo eggs.


After exactly 17 or 20 minutes (depending on size of your eggs), remove from heat and drain off water from the eggs. Transfer the eggs to the bowl of ice cubes and cold water. Let eggs cool at least 10 minutes in cold water, then drain either store in refrigerator or peel** the eggs. NOTE: Watch the time when cooking the eggs carefully. Overcooking causes a green layer to form around the yolk. This layer is caused by a reaction between the iron in the yolk and the sulfur in the white. Heat speeds up this reaction, so the longer your eggs cook, the greater the chance of discoloration.

** Easy Peel Eggs:

To peel eggs easily...

1. Cool eggs in refrigerator

2. Tap the top and bottom of the eggs on the counter to crack.

3. Roll the egg with the palm of your hand back and forth on the counter so that it looks like little broken pieces all over the shell.

4. Start peeling from the wide end of the shell and remove the skin all around the egg that holds the shell on the egg.

Saturday, February 16, 2008

Spicy Low-Fat Pumpkin Muffins

For Quick, Easy and Delicious Muffins...
Doctor up those mixes!

Move over Sandra Lee. Annie has some business
with boxed baking mixes.

I don't normally like to use boxed mixes for muffins, but sometimes you just can't beat 'em. Especially the Pillsbury Quick Bread mixes. I always turn out great loafs and muffins when using them. Of course, by adding my own ingredients to flavor them and reducing the fat, they are even better tasting and healthier. You can't go wrong.
These muffins turned out exceptionally good.
They were very tender and super flavorful!


Spicy Low-Fat Pumpkin Muffins

1 (14 oz.) package Pillsbury® Pumpkin Quick Bread
1/4 cup soy milk
1 (6 oz.) container plain fat-free yogurt
1/3 cup unsweetened applesauce
4 teaspoons canola oil
2 large egg whites
1 tablespoon molasses
1/2 teaspoon cinnamon
1/2 teaspoon grated candied ginger

1. HEAT oven to 375°F* if using a convection oven; 400°F if not.
Spray 12 muffin cups with no-stick spray or line with paper cups.
2. Combine yogurt, soy milk, oil, applesauce, grated ginger,
cinnamon, egg whites and molasses in a large bowl. Add
pumpkin bread mix and stir until just blended, about 50 strokes.
3. FILL each muffin cup, dividing batter evenly with filling; about
3/4 full.
4. BAKE for 15 minutes. Remove muffins from pan. Place on baking rack to finish cooling.

*Reduce temperature by 25°F if using a dark pan.

Wednesday, February 13, 2008

Happy Valentine's Day!


The Best Thing About Dipping Your Own Strawberries...

Is That, If You're Not Happy With The Results...
You Get To Eat Them.


And Knowing What a Perfectionist I Am,
I Was Lucky To Have Any Left To Give As Gifts!


An Easy, Quick, Inexpensive and Healthy Way to Enjoy Valentines!
All you need is strawberries, good dark chocolate,
white chocolate and will power.

I hope everyone has a great day. Enjoy!

Tuesday, February 12, 2008

For Valentine's Day...

Will Your Valentine's Day be Sweet or Sour?
Mine will be both!

Who makes Lemon Cupcakes for Valentine's Day? Well, uh, me. I decided to go untraditional this Valentine's Day. It wasn't really a decision as much as a process of elimination. I had lemon cake mix that I've been meaning to use, so I figured why not.

To give the cup cakes a little bit of a Valentine's theme, creamy chocolate frosting seemed the best plan of action. And what's creamier than cream cheese?

This frosting seems so sinful, but it's actually less fattening than frosting made with butter, because I used Neufatchel cream cheese which has less saturated fat than butter. Plus it seemed appropriate to pair lemon cake with a frosting that had a little bit of a tang.

...And of course, kisses add to the love motif.

So let there be...
Chocolate Kissed Lemon Cupcakes

1 box lemon cake mix
Freshly grated lemon rind
1/2 tsp. almond extract

Prepare cake mix according to directions on box, adding in the grated lemon rind and almond extract. Bake as directed. Let cool completely.

Chocolate Cream Cheese Frosting

1 (8 ounce) package neufatchel cream cheese, softened at room temperature
4 (1 ounce) squares unsweetened chocolate, melted
3 1/2 cups confectioners' sugar
1 tablespoon vanilla extract
Dash of salt
2 tablespoons soy milk, room temperature
24 Hershey's dark chocolate kisses, unwrapped of course
Colored sprinkles, optional

In a large bowl or electric mixer, beat cream cheese until fluffy. Pour melted chocolate into cream cheese and mix on medium speed until well blended. Add vanilla and salt. Add the confectioners sugar one cup at a time, scraping the sides of the bowl, and alternating with the milk. Mix until the frosting is spreading consistency; adding additional sugar or milk if necessary.
Frost cupcakes with a small spatula or knife and then pipe a star on the top of each. Sprinkle with colored sugar and add a chocolate kiss.

Monday, February 11, 2008

Oriental Garden Pilaf

...Made with Barley

I don't know about you, but I have never eaten barley other than in Campbell's beef and barley soup (which I always liked as a kid). I don't really eat canned soup anymore because it is mostly wretched and the sodium content is enough to choke a horse.

After seeing several recipes and reading about it's nutritional value, I decided to give it a try. I've decided~ like it.

If you would like to know a little more about this ancient grain read on...

BARLEY FACTS and TRIVIA:

Barley is one of the oldest domesticated grain crops. It has been cultivated for over 8000 years. In Athens barley was, according to Pliny, the special food of the gladiators (the hordearii, or 'barley-eaters').

In about 1305, Edward I of England decreed that one inch should be the measure of three barleycorns, and English shoe sizing began; thus a child's shoe that measured 13 barleycorns became a size 13.

Historians report that up until the 16th century, it was the most important grain on the European continent. It was also used as currency and as a measuring standard.

Almost half the United States crop of barley is used for brewing beer and most of the rest is used for feeding livestock. Source: Food Reference Website

If your white rice is getting boring here are a few good reasons to swap it for barley:

1. It is really yummy. It can be served plain as a side dish, as a tasty pilaf or in soup!

2. It's good for you. Packed with nutrition, barley is a very good source of fiber and selenium, and a good source of phosphorus, copper and manganese.

3. Barley's can help keep you regular and provides intestinal protection. (Throw that ex-lax away and say good-buy to expensive acidophilus.)

4. It can lower cholesterol. Ditch the oatmeal tomorrow morning and have barley for dinner!

Here's a recipe that I tried and thought was really good! I found it on the back of the Mother's Natural Quick Cooking Barley...

Oriental Garden Pilaf
Adapted from Mother's

1 1/3 cups low-sodium chicken broth
2/3 cup Mother's Quick Cooking Barley
1 tbsp. canola oil
1/2 cup thinly sliced carrots
1/2 cup thinly sliced celery
1 clove garlic, minced
1/2 cup thinly sliced mushrooms
1/4 cup chopped leeks or green onions
1 tbsp. reduced sodium soy sauce

In medium saucepan, bring chicken broth to a boil. Stir in barley; reduce heat. Cover; simmer 10-12 minutes or until tender. In large skillet, heat oil. Cook leeks, carrots, celery and mushrooms over medium high heat 4-5 minutes. Add garlic; continue cooking 1 minute. Add cooked barley and soy sauce; mix well. Continue cooking over medium heat until heated through.
4 servings

Sunday, February 10, 2008

Mediterranean Grilled Chicken Kabobs

I Suck At Grilling.

I think it's official, I'm getting old. Why do I think I am old? Well, I think my metabolism has gone on strike. It's February, a whole month has gone by since Christmas and I'm still trying to fit into my favorite pair of pants. These pants fit fine all year long until I pigged out during the Holidays and I can't seem to lose a few lousy pounds. Scratch that, I can lose a few pounds if I exercise everyday for an hour and not eat anything "good" for a week and a half. But as soon as I indulge a bit, the few pounds I'd lost - find there way back, and fast.

So what's a hungry girl to do? I love my sweets and munchies. In fact, after putting the few pounds I'd lost this week, right back on after this weekend, I said frig it. And I just ate a delicious frosted brownie, trail mix and pretzel nuggets. I felt like I was punishing my metabolism for being "bad"! Stupid, huh? Now I just feel worse. I guess it's back to the drawing board.
.. ... .. ... .. ... .. ... .. ... .. ... .. ... .. ... .. ... .. ... ..

I love the way grilled food looks with it's beautiful charred markings. I love the way grilled food tastes with that deep smoky flavor. I love the idea of grilling, it just seems so fun. But I suck at grilling. I always tend to overcook the outside of the meat and under cook the inside. Even giving it extra time than the recipe suggests will result in a pink center. It is very frustrating.

Maybe it's because I am using an indoor grill pan on my electric stove top. I still have trouble with that electric stove top (I've always used gas stoves in the past). It seems like high heat is always too high and medium is not hot enough. It's hard to find that happy middle ground.
The only thing I like about it is that is easy to clean because it's all one piece. And it looks sexier than the gas top stoves. But in this case I'll take function over fashion any day.

Nevertheless, if cooked properly it was a really tasty dish. So give it a try and I'm sure yours will turn out better than mine did.

Mediterranean Grilled Chicken Kabobs


1 pound boneless skinless chicken breast, cut into 3/4-inch cubes
8 (10-inch) skewers, soaked in water for at least 20 minutes
2 tablespoons olive oil
1/2 teaspoon lemon zest
1 tablespoon lemon juice
2 cloves garlic, minced, pressed, or zested on microplane
1/2 teaspoon sea salt
1/4 teaspoon freshly ground pepper
1 cup grape tomatoes
2 small zucchinis, peeled leaving stripes, cut in 3/4" rounds
Cooking spray
2 tablespoons chopped fresh parsley

Whisk together the oil, lemon zest, lemon juice, garlic, pepper and salt. Add the chicken to the marinade and toss to coat. Marinate the chicken for 20 minutes or up to 2 hours.

Add 4 pieces of the chicken, 4 grape tomatoes, and 8 zucchini rounds onto the skewers, alternating them any way you like. Spray a grill pan with cooking spray and preheat over a medium-high heat. Grill the chicken until cooked through, about 4 to 5 minutes per side. Sprinkle with parsley and serve over rice, or barley pilaf.


Wednesday, February 06, 2008

Peanut Butter Blossom Surprises

I LOVE SURPRISES!

I think everyone has had a peanut butter blossom cookie at one point in their life. You know, it's the peanut butter cookie with the Hershey's Kiss on the top. As simple as they are, they are always a hit during the holidays or whenever I make them. I could spend all day baking up a batch of the most decadent and time consuming cookie recipes and put them side by side with the peanut butter blossoms and the blossoms always win!

So I don't fight it anymore, I just make them and watch 'em go! I wanted to give the recipe a little twist however by adding a little surprise in the center instead of the kiss on the top.

So I filled each cookie with Nutella! (Chocolate hazelnut spread for those of you who have not had the pleasure.) All I can say is... They rock.

Peanut Butter Blossom Surprises
  • Nutella Chocolate Hazelnut Spread
  • 1/2 cup shortening
  • 3/4 cup creamy peanut butter
  • 1/3 cup granulated sugar
  • 1/3 cup packed light brown sugar
  • 1 egg
  • 2 tablespoons milk
  • 1 teaspoon vanilla extract
  • 1-1/2 cups all-purpose flour
  • 1 teaspoon baking soda
  • 1/2 teaspoon salt
  • Granulated sugar

1. Heat oven to 375°F.

2. Beat shortening and peanut butter in large bowl until well blended. Add 1/3 cup granulated sugar and brown sugar; beat until fluffy. Add egg, milk and vanilla; beat well. Stir together flour, baking soda and salt; gradually beat into peanut butter mixture.

3. Shape dough into 1-inch balls. Once shaped, press your finger in the middle of the cookie to form a small opening. Add a 1/2 teaspoon of Nutella into the opening. Close the opening by pressing the dough back together and reshape into a ball. Roll in granulated sugar; place on ungreased cookie sheet.

4. Bake 7 to 9 minutes or until lightly browned. Remove from cookie sheet to wire rack. Cool completely. About 4 dozen cookies.

Tuesday, February 05, 2008

Jaswell Farms Chocolate Chip Cookies

In Honor of Fat Tuesday!


I had made these cookies once before and really liked them. This Christmas I decided to make a double batch so I could give them out as gifts. The recipe is quite large to begin with, so a double batch was a little hard to work with. I managed however.

Actually I made so much of this cookie dough that I wrapped up a log of raw dough and froze it. I took it out tonight and baked up a batch in honor of FAT TUESDAY! I did my share of indulging, so much so that tomorrow for me it's FAT PANTS WEDNESDAY...

The only thing that I would change in this recipe is the addition of vanilla. I forgot to add it to mine and I did notice it missing. That's because I love vanilla and wouldn't normally make a cookie without.

Jaswell Farms Chocolate Chip Cookies1 2/3 cups sugar
3 1/2 cups flour
2/3 cups margarine
1/3 cup oil
2 teaspoons vanilla (my addition)
2 teaspoons baking soda
1 1/2 tablespoon molasses
2 eggs
2 cups milk chocolate chunks (I used chips)
1 cup chopped walnuts or pecans (optional, I didn't use any nuts)

Beat together margarine, sugar, and oil until fluffy. Beat in eggs and molasses, then add flour and baking soda. Mix in milk chocolate chunks and nuts. Scoop cookie dough onto greased cookie sheet (I used parchment paper). Flatten each scoop of dough and bake.

Jaswell Farm makes big cookies, using two ounces of dough per scoop. You might want to use just a tablespoon for each.
(That's what I did)

They bake the large cookies at 325 degrees in a convection oven for 20 minutes.
For conventional ovens and a tablespoon of dough, cook at 350 degrees and start to check for doneness after 8 minutes. (I cooked my tablespoons of dough at 325 in a convection oven for 8 minutes). They were chewy in the center and crisp on the outside, just the way I like!

Sunday, February 03, 2008

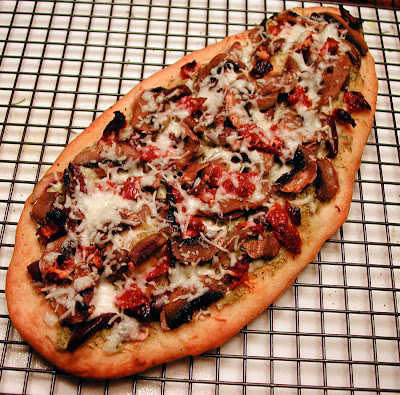
Super Pizza... for the Super Bowl.

It was a touchdown!

Pizza just seemed like a no-brainer for the super bowl. I have to admit, I am not a regular watcher of football, but I, like everyone else in the world, did watch the super bowl. I figured why not celebrate with pizza!

I used store bought pizza dough which saved a lot of time and trouble, although I do like to make my own dough when I have the time.

Since I wanted to have the pizza ready during the game and didn't want to have a mess around the house, I decided to make focaccia out of the dough and pre-bake it and then add my toppings later. That way it only takes half the time to bake and there is no clean up. I got all my toppings chopped, sliced and ready earlier in the day as well.
It was outstanding! A real game pleaser!!!

Focaccia Pizza


1 lb. store bought pizza dough
2 tablespoons extra virgin olive oil
1/2 teaspoon dried rosemary
1/2 teaspoon course sea salt
1/4 teaspoon fresh ground pepper

Take dough out of bag and place in a large oiled bowl. Cover with plastic wrap and let rise until double in size, about 1-2 hours.

Pre-heat pizza stone in a 500 degrees oven.

Remove dough from bowl with floured hands and place on a floured counter or cutting board. Roll out dough into desired shape and press fingers down into the middle of the dough. (I divided the dough in half and made two separate pizzas.) Drizzle with olive oil, top with the rosemary, salt and pepper.

Turn oven temperature down to 400 degrees. Set dough on pizza stone and bake for 10-12 minutes.

The focaccia may be eaten at this point as is or topped as follows:

3/4 cup artichoke and spinach dip, optional (you could use cream cheese with added herbs and spices instead)
1/4 cup sun-dried tomatoes, chopped into small pieces
1/4 cup kalamata olives, sliced
1/4 cup green olives, sliced
1/2 cup mushrooms, sliced thin
1/4 cup fontinella cheese, shredded
1/2 cup reduced fat mozzarella, shredded
1-2 tablespoons extra virgin olive oil
1/2 teaspoon Italian seasoning
1/8 cup fresh Italian parsley, chopped, optional

Spread the artichoke and spinach dip over the top of the focaccia and top with shredded fontinella. Add the olives, sun-dried tomatoes and mushrooms. Drizzle with a one tablespoon of extra virgin olive oil and sprinkle with Italian seasonings.

Bake in a 400 degree oven for 10-12 minutes, remove from oven and add the mozzarella cheese. Place back in the oven and bake for an additional 5 minutes or until cheese is melted.
Drizzle with remaining tablespoon of olive oil and sprinkle with parsley, if desired.