Thursday, December 28, 2006

More Biscotti Gifts!!


Wow. I am such a slacker lately. I'm sorry I haven't been posting. I am still recovering from the holidays!

This was one of the biscotti gifts that I made for Christmas. I made three different kinds of biscotti and grouped two of each together in clear cellophane and aranged them in this cute little flower pot. They kind of look like flowers coming up out of the pot, don' t they? I thought they were too cute!

I made Oatmeal chocolate chip, Almond and Vanilla biscotti. Everyone loves the Oatmeal chocolate chip biscotti because they remind you of mom's chocolate chip cookies. The Almond biscotti are also very popular because they are the classic biscotti.

I love them both!
I already posted the Vanilla biscotti recipe and I will post the Oatmeal chocolate chip biscotti recipe and the Almond biscotti recipe soon! So stay tuned.

Wednesday, December 27, 2006

Vanilla Biscotti


Every Christmas I give cookies to my friends, family, neighbors and clients. I usually decorate and package them for the season. This holiday I got a great idea from Food TV. Sandra Lee created gifts by filling clear glass mugs with cookies and hot chocolate. I loved the presentation so much that I decided to put my own spin on it.

I found the most perfect ruby red glass mugs at the Christmas Tree Shop for get this (2/$1.00). I bought all that they had left on the shelf!! Unfortunately, with all the hustle and bustle I forget to take a photo of them all done up. I really regret that because they were really cute.

I rapped 2 biscotti in clear cellophane paper and filled holiday goody bags with 3 tablespoons of Ghiardelli Hot Chocolate (enough for one cup of hot chocolate). I attached a small note with heating directions for the hot chocolate and placed it all in the mug.

Vanilla Cinnamon Biscotti

Recipe adapted from Carol's Biscotti of Scialo Bros. Bakery in Providence, RI Printed in the Providence Journal, December 2001

1 cup granulated sugar
1/2 cup brown sugar
2 cups all-purpose flour
1/2 teaspoon cinnamon
1/4 teaspoon nutmeg
2 teaspoons baking powder
2 eggs
3 tablespoons butter, softened
1 1/2 tablespoons pure vanilla
Egg wash(egg mixed with a little water)

Preheat oven to 350 degrees.

1. Combine the suar, baking powder, and butter.
2. Blend in the vanilla.
3. Mix in the eggs and add the flour one cup at a time.
4. Spoon dough onto a parchment lined baking sheet to form two logs 1 1/2 inches wide by 1 inch high.
5. Brush logs with egg wash and bake for 20 minutes turning pan half way through.
6. Remove them from the oven and let cool for about 5 minutes. Move the logs to a cutting board and cut logs diagonally into slices 1 inch thick to produce cookies. Turn each onto its side and rebake at the same temperature for another 5 to 10 minutes depending on how crisp you like your cookies.
7. To decorate melt dark and milk chocolate in separate bowl and spread a thin layer over cool cookies. One dried, drizzle with melted white chocolate and sprinkle with colored sugar or jimmies.

I felt like these were the easiest and safest cookies to give a large number of people. I always worry about nut allergies and some people just don't like nuts, which I can't imagine, but it's true. Cinnamon and vanilla seem to be flavors that everyone likes. They seemed to be a hit, so I guess I did good!!

Friday, December 15, 2006

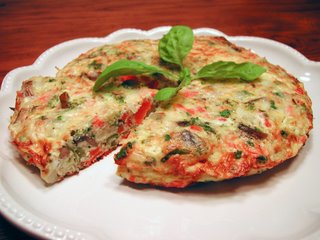
QUICK & EASY FRITTATA


WOW! It's been so long since I've posted. I have been extremely busy and have not had any time to type out recipes, take photos or cook anything really worth posting for that matter.

I made this fritatta one night in a flash. I used leftover mixed veggies, shredded cheddar cheese and grated Pecorino Romano cheese.

I just sauteed some chopped garlic in olive oil, added about 3/4 cup chopped veggies, added salt and pepper, Italian seasoning, garlic powder, fresh chopped parsely. After a few minutes I added 6 beaten eggs with one tablespoon of milk, 1/4 cup cheddar and 1/8 cup of romano.

I cooked it on the stovetop until almost set on top and then placed the oven proof skillet under the broiler for a few minutes. I set the pan on a cooling rack for 5 minutes and it was ready to eat.

I have been baking up a storm trying get all of my holiday goodies done. This past weekend was a Biscotti Marathon. I made 4 different types of Biscotti. I decorated and packaged them for Christmas. It was fun, but soooo much work. My back is killing me and I have'nt slept much lately. I'm sure all you bakers out there understand!

I will post the cookie recipes as soon as I get a chance. Happy Holidays to all of you!

Monday, December 04, 2006

Sooo busy!!! NoTime to Post.

Sorry about the lack of posts lately. I am just too busy at work and too tired after work. Between trying to decorate for the holidays and shopping, it is just too hectic! I just wanted to let you all know that I am alive and well!

I did make a delicious Chicken Piccata recipe from Giada De Laurentiis. I didn't take a picture of it because I thought I might have posted it in the past. But you should check it out, it's really good.

Sunday, November 26, 2006

The Perfect Gift!

The Forbidden Fruit Just Got a Bit More Sinful

These treats are the apple of my eye. Yum! They are fairly easy to make. They just take a little time and patience. But the end result is definitely worth it.

I found many recipes online for these apples, and after reading through all of them, I mixed and matched a few to create my own. I used the recipe on the Kraft Caramels for the caramel coating step and I found some helpful hints from Starchefs and Fabulous Foods online.

Chocolate & Caramel Covered Apples
5-6 medium apples (Granny Smith or 3-4 large Mutzu if available)
Heavy wooden sticks

1 bag (14 oz.) KRAFT Caramels
2 Tbsp. water
12 ozs. good-quality chocolate (milk, semisweet, or a combination), chopped
1-1/2 tsp. solid vegetable shortening (or vegetable oil)
About 1 c. chopped nuts (walnuts, peacans or almond slices)
About 1/2 c. shredded coconut
About 1/4 c. mini chocolate chips or peanut butter chips
About 1/4 c. Craisins or chopped dried cherries
Candy Sprinkles
White chocolate for drizzling


Wash and dry apples well, and keep at room temperature for at least 30 minutes. Prepare a pan by lining the bottom with parchment paper cut to fit (DO NOT use wax paper or foil). If you don't have parchment paper, line the pan bottom with several layers of plastic wrap. The pan should be able to accommodate all apples without them touching.

INSERT 1 wooden pop stick into stem end of each apple; set aside.
PLACE caramels in medium saucepan. Add water; cook on medium-low heat until caramels are completely melted and mixture is well blended, stirring constantly.
DIP apples in caramel mixture, coating evenly, use a spoon to help you cover the top part of the apple. With the knife, scrape off any extra caramel from the bottom
of the apple.
Immediately roll dipped apples in coconut. Place on parchment lined pan.

PLACE the apples in the refrigerator to chill for 30 to 60 minutes so that the caramel can set up.

In medium heatproof bowl, place chopped chocolate of choice and shortening. Place bowl over hot simmering water on low heat, and stir often until melted. Remove from heat and hot water; stir until smooth.

Tear off a sheet of wax paper about one foot long. Place on your work surface. Place the chopped nuts, chocolate chips, craisins and sprinkles in a mound on the wax paper.

Remove the apples from the refrigerator.
Dip the bottom of the caramel apple in chocolate. Use a spoon to drizzle melted chocolate over the top, completely encasing the apple in chocolate. Place the chocolate-covered apple into the nuts, craisins and chocolate chips; gently pat into the apple up the sides to about the widest point of the apple. You may have to place some of the trimmings on one piece at a time if you want a neat, professional look. Place on parchment-lined pan.
If using white chocolate as well, drizzle over the apples and then add candy sprinkles, if desired.

Allow chocolate to set, before wrapping in cellophane or plastic wrap. Refrigerate for up to 2 days.

These apples make a great first impression and a lasting impression once eaten. They are delicious. Why spend $15-$20 bucks for one, when you can make your own. It's fun and creative. You can use any coatings or chocolate that you like. And best of all they make a great gift!

Do you make and give holiday food gifts?


Friday, November 24, 2006

The Feast is Over!

I Was Thankful for A Bountiful Table

Thanksgiving. A time for family, giving and thankfulness. I love this Holiday!
This year my sister was the hostess and I was responsible for the rolls and mashed potatoes.
The dinner was great and the day relaxing. What more could you ask for in a holiday?

Mashed Potatoes

3 pounds Yukon Gold potatoes, peeled and cut in quarters
3/4 to 1 cup warm milk
5-6 tablespoons unsalted butter, softened
1 bay leaf
1 tablespoon Salt
Pepper to taste


Place potatoes in a medium pot and cover with cold water.
Bring to a boil, heat to a simmer. Add the tablespoon of salt and continue to simmer until potatoes are fork tender, about 15-20 minutes. When potatoes are done, drain and return potatoes to pot to dry slightly. Mash potatoes in the pot with a potato masher. Remove and discard bay leaf. Add warm milk to potatoes, over heat, mix with electric mixer until smooth. Add butter and heat until finely textured and fluffy.

This was a mix of different recipes, some of which I found online. One by Sara Mouton, one by Tyler Florence and my own. They turned out fine and everyone seemed to like them.

How Did Your Day Go?

Monday, November 20, 2006

Keeping It Simple!

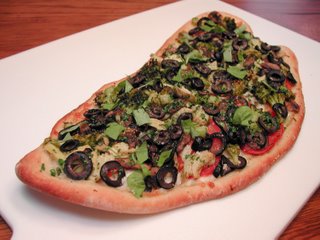
Free-Stlye Veggie Pizza

With Thanksgiving quickly approaching, I have been cooking very little lately.

Left-over mixed vegetables, half of a salad tomato, mozzarella cheese, pecorino cheese and store bought pizza dough, made for a delicious and very quick dinner. I added a little Italian seasoning, olive oil and topped it with fresh basil just before serving.

I only used half of the pizza dough and used the other half to make another pizza crust which I pre-baked and froze for future use! I guess that's why the shape is kind of oblong, because I cut the dough in half and somehow couldn't get a perfect circle. I kind of like this shape though, it seems more casual and homemade.

The only problem I ran into was half way through cooking the crust, it blew up like a balloon and I had to pierce it. I'm glad I checked on it or I would have had a hollow ball of bread instead of a pizza crust!

I just heard on the food network that pizza(take-out) is the most popular dinner on the night before Thanksgiving. Of course it is, no one in their right mind is going to cook dinner with all of the work they have preparing the Thanksgiving meal.

What are you having for dinner Wednesday night?


Sunday, November 19, 2006

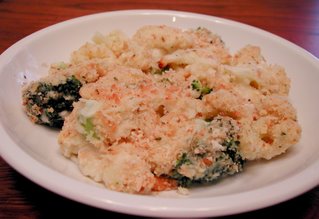
Cheesy Broccoli & Cauliflower

I love broccoli!

I love that I love broccoli, since it is so good for you! Broccoli and cauliflower are known as cruciferous vegetables because they contain compounds that may help prevent cancer.

Broccoli is a member of the cabbage family and is closely related to cauliflower. I was suprised to read on the World's Most Healtiest Foods Website that it's origin began in Italy!

The health benefits are many, ranging from:
* Supporting Stomach Health
* Optimizing Your Cells' Detoxification & Cleansing Ability
*
Help for Sun-Damaged Skin
*
Cardio-Protectiion
*
Cataract Prevention
* Stronger Bones
* Immune System Booster
* Birth Defect Fighter

Another important thing I learned is that the best way to cook broccoli or other cruciferous vegetables is to steam them. Actually, I already knew this but I didn't realize how many nutrients are lost when microwaving or boiling.

I always thought microwaving vegetables was a good way to keep the nutrients, but I was wrong. According to this website "microwaving broccoli resulted in a loss of 97%, 74% and 87% of its three major antioxidant compounds-flavonoids, sinapics and caffeoyl-quinic derivatives. In comparison, steaming broccoli resulted in a loss of only 11%, 0% and 8%, respectively, of the same antioxidants."

Facinating, isn't it? I guess I will be steaming more often!

This is a great post for Sweetnicks ARF/5-a-day Tuesday evening round-up. Go check it out!

Here is an easy and healty way to enjoy these two vegetables:

Cheesy Broccoli and Cauliflower
(Original recipe was Cheesy Cauliflower cut from the newspaper-I didn't notice the author)


1/2 small head of cauliflower & 1 small head of broccoli
or one 16-20 ounce bag of frozen cauliflower and broccoli florets
3/4 cup 1 percent lowfat milk (I used Simply Smart fat-free milk)
1 tablespoon all-purpose flour
1/2 teaspoon Dijon mustard
1/8 teaspoon garlic powder
3/4 cup shredded reduced fat Cheddar cheese (I used 2% milk Cracker Barrel cheddar)
2 tablespoons grated Parmesan cheese (I used Pecorino Romano)
2 tablespoons dried seasoned bread crumbs

Steam the cauliflower and broccoli for around 8-10 minutes, until tender. Set aside.

While the vegetables are cooking, whisk together the milk, flour, mustard, and garlic powder om a small saucepan until well blended. Place over medium-high heat and bring to a simmer, stirring until the mixture thickens slightly, about 2 minutes.

Stir in the cheddar and parmesan cheese until melted. Preheat broiler on high.

Arrange the vegetables in a baking pan and pour the cheese sauce evenly over the top. Sprinkle with the breadcrumbs and broil until the crumbs turn golden brown, about 2 minutes.

Prep. time: 5 minutes
Cooking time: 15 minutes
Calories 140, fat 20 g, saturated 1g, sodium 80mg, carbs. 21g, fiber 2g, protein 9g.

I liked this recipe because it was a
healtly and guilt-free way to enjoy a cheesy side dish. With the holidays quickly approaching, I think we could all benefit from a recipe like this. No?

Speaking of the holiday, we are going to my sisters house this year and I am responsible for the mashed potatoes and dinner rolls. I got away easy, huh?
I was going to make a potato pie with parmigiano cheese but my sis doesn't think it will go well with the turkey and gravy. So I'm making basic mashed potatoes.

Does anyone have a tried and true mashed potato recipe or any ideas on which rolls to bring for a traditional turkey dinner?

Thursday, November 16, 2006

To satisfy my sweet tooth!

Because I Just Had To Have Dessert!

I'm trying to be good lately. Especially with the Holidays coming up. So I whipped a something quick.

Just a Bartlet Pear with sliced Dried Plums and Walnuts Sauteed in Butter with a Honey, Cinnamon and Maple Syrup Glaze!

So What Are You Having For Dessert??

Tuesday, November 14, 2006

Italian Wedding Soup - Recipe Make-Over

Follow a recipe or trust your instincts?

Of course, now I say trust your instincts, but for some reason when I made this soup the first time I followed the recipe. Big mistake!

Sometimes when you read through a recipe you notice a few things that you would do differently, from experience or somtimes just instinct. Well in the case of this soup, I knew that I should cook the escarole separately and add it in when ready to serve. But, the recipe said to cook it in the broth, so I did and it was a disaster. The escarole turned the soup into a swampy dark green color and it didn't smell right either.

Let me first say, however, that I planned on making the soup the night before and serving it the next day. I guess if you were to make the soup and eat it all that day it might be ok. But for me, the idea of making soup appeals to me because I look forward to eating it for a few days after making it.

So I would never add the escarole in the pot unless I knew it was all going to be gone that same day. I actually save the escarole and pasta in separate containers and add them to the soup bowl before laddling in the soup. This way the broth says nice and bright and the pasta doesn't get too mushy either!

The original recipe also added onions and an egg/cheese mixture which is traditional to this soup. I chose not to add either. I don't think the soup keeps as long in the refrigerator when onions are added and I don't really care too much for the egg mixture.

I'm posting the recipe with my changes. The original recipe was printed in my local newspaper years ago and it was from Vaccaro's Trattoria in Ohio.

Italian Wedding Soup

Meatballs (My own recipe)
1 lb. Ground Beef (I used Cerified Angus Ground Beef 10% fat)
2 eggs
2 slices stale Italian bread or sliced white bread, crusted removed
4 tbls. milk
2 cloves garlic, minced
1/4 cup fresh parsley, minced
8-10 fresh basil leaves, minced
3/4 cup grated Pecorino Romano cheese

In a small bowl, soak the bread in the milk. Combine all ingredients except ground beef in a large bowl and mix well. Add in beef and gently work the mixture with your hands until evenly combined. Do not overmix.

Roll the meat into grape size balls. Place on a parchment lined or lightly greased foil lined baking sheet (with sides).

Bake in a 350 degree oven for 10-12 minutes, turning half way through. At this point, the meatballs may be cooled and refrigerated or frozen until ready to use.

Soup
3 quarts reduced sodium chicken broth (I used Swanson)
1/2 cup chopped carrots
3/4 cup chopped celery
4-5 cups chopped escarole
2 cups tiny meatballs
2 cups cooked chicken, shredded or diced
1 cup of any very small pasta (I used pastina-stars)
Freshly ground pepper to taste
1 bay leave
Grated Pecorino Romano cheese

Cook escarole in boiling water for around 15 minutes. Drain and set aside. Cook pasta in a separate pot until al dente. Drain and set aside.

Measure all ingredients and place them in bowls on the counter.
Bring broth to a simmer in a large soup pot. Add carrots, celery, bay leave, meatballs and chicken. Simmer uncovered for around 30 minutes, until the carrots are tender. Season with ground pepper.

Portion out the escarole and pasta in the soup bowls. Laddle the soup in each bowl and sprinkle with a generous amount of Pecorino Romano cheese. Serve immediately with crusty Italian bread. Remember to remove bay leave and discard.


I really enjoyed this soup! The only thing I might try next time is to add in a little onion powder since I omitted the onions. I'm not sure if it would make a difference but I'll give it a try.

Do you follow recipes or follow your instincts?

Sunday, November 12, 2006

Boxed Cake Mix and Canned Frosting...Yummy!

Pillsbury Funfetti Cake and Betty Crocker Vanilla Frosting
"Everyone's Favorite?"

Today is my friend Jen's birthday. (Happy Birthday Jen!!...pssst-"You're Old" Hahahahha!)
She is the creator and host of Casual Slack which boasts many dedicated readers of her daily nonsense. I mean this in a good way. She works hard to make the sometimes mundane week, exciting and funny! Check it out-but beware parental guidance is recommended. ;)

So on to the cake. Funfetti cake is Jen's favorite cake, as well as my neice's. As a matter of fact it seems like everyone likes this cake. I have to admit I never really thought I would like it. Why? First of all because it is not chocolate and it just seems kind of juvenile. I mean with all the sugar and colored sprinkles in it.

But it seems like every time I make it, I say to myself I'm not going to eat a piece and somehow it calls to me. I end up eating it and liking it. I guess it just brings out the kid in all of us!

I just found this recipe for Funfetti Cookies. It got some really great reviews. I guess I'll have to give it a try.
Even better, why don't you make them and let me know what you think!

Friday, November 10, 2006

Crunchy Parmesan Chicken

Terrible Photo-Great Recipe!

I saw this recipe on Everyday Italian on the Food Network. I generally like Giada's recipes, so when I saw her making this one, I had to give it a try.

As usual, I loved it. I didn't use chicken tenders however, I used chicken cutlets. I turned out great anyway. I especially loved the vinegarette dipping sauce. It was actually thick and creamy and very tasty.

Crunchy Parmesan Chicken

Recipe courtesy Giada De Laurentiis

4 tablespoons plus 1/2 cup extra-virgin olive oil
1 cup buttermilk
1 1/2 pounds chicken tenders (about 18)
3 large garlic cloves, minced
1/2 teaspoon salt
3 tablespoons balsamic vinegar
Freshly ground black pepper
1 1/4 cups freshly grated Parmesan
3/4 cup Italian-style seasoned bread crumbs


Preheat the oven to 500 degrees F.

Brush 1 tablespoon of oil over each of 2 heavy large lined baking sheets. Place the buttermilk in a large bowl. Add the chicken tenders and stir to coat. Let stand at least 15 minutes and up to 30 minutes.

Meanwhile, mash the garlic with the salt in a medium bowl. Whisk in the vinegar and then the remaining 1/2 cup of oil. Season the vinaigrette, to taste, with pepper. Transfer the vinaigrette to a small serving bowl.

Stir the Parmesan and bread crumbs in a pie dish. Remove the chicken tenders from the buttermilk and dredge them in the bread crumb mixture to coat completely, pressing to adhere. Arrange the coated chicken tenders on the prepared baking sheets, spacing evenly. Drizzle the remaining 2 tablespoons of oil over the chicken tenders and bake until they are cooked through and golden brown, about 12 minutes.

Transfer the chicken tenders to a platter and serve the vinaigrette alongside for dipping.

I guess the dipping sauce was the key to this recipe. When ever I make oven fried chicken, it always seems dry. I always end up covering it with tomato sauce for that reason. In this case the chicken didn't seem dry to begin with, but the dipping sauce gave it a kick and made it seem even more tender and juicy.


Wednesday, November 08, 2006

Gingerbread Biscotti

Just Practising For The Holidays!

I found this biscotti recipe on allrecipes.com. I've been craving biscotti for the last few weeks and finally gave into my temptation. I didn't feel too bad about this recipe though, since it is kind of on the healthy side. Hey, it does have whole wheat flour in it and I reduced the sugar a bit. Also, the ginger and other spices are known to help with digestion. So if eaten as an after dinner cookie, it could be considered a healthy digestive!


Gingerbread Biscotti
INGREDIENTS:
1/3 cup vegetable oil, (I used canola oil)
1 cup white sugar (I used 3/4 cup)
3 eggs
1/4 cup molasses
2 1/4 cups all-purpose flour
1 cup whole wheat flour
1 tablespoon baking powder
1 1/2 tablespoons ground (I used 1 Tablespoon)
ginger
3/4 tablespoon ground
cinnamon
1/2 tablespoon ground cloves
1/4 teaspoon ground nutmeg
I also added:
1/2 cup crystalized ginger
1/2 cup toasted chopped walnuts
1/2 cup raisins
DIRECTIONS:
1. Preheat the oven to 375 degrees F (190 degrees C). Grease a cookie sheet. (I used parchment paper).
2. In a large bowl, mix together oil, sugar, eggs, and molasses. In another bowl, combine flours, baking powder, ginger, cinnamon, cloves, and nutmeg; mix into egg mixture to form a stiff dough.
3. Divide dough in half, and shape each half into a roll the length of the cookie. Place rolls on cookie sheet,(I used 2 cookie sheets) and pat down to flatten the dough to 1/2 inch thickness.
4. Bake in preheated oven for 25 minutes (I baked them 20 minutes). Remove from oven, and set aside to cool.
5. When cool enough to touch, cut into 1/2 inch thick diagonal slices. Place sliced biscotti on cookie sheet, and bake an additional 5 to 7 minutes on each side, (I did 4 minutes on one side and 2 minutes on the other) or until toasted and crispy.

These cookies are very spicy and have a little bit of a kick. I enjoyed them and they freeze really well too. I may add them to my holiday cookie line-up!

Are you thinking about holiday recipes yet?

Monday, November 06, 2006

Pumpkin Parfait

Good- But Could Be Better!
(in my never to be humble opinion)

I had some leftover pumpkin from my Chocolate Harvest Cake and hated to throw it away, so I searched high and low for a pudding recipe to use it up. I found this recipe on all recipes.com. I wanted something quick, easy and light; this one fit the bill.

I think I would have preferred a cooked pudding with a richer flavor, since I thought this had a bit of any after taste from the sugar substitute. But two of my friends from work absolutely loved this pudding as is. So I guess it is worth posting.

Note: After reading some of the reviews on this recipe, I followed the advise from two people who tried it and used 2 packages of instant pudding.

Pumpkin Parfait
INGREDIENTS:
1 cup pumpkin puree
1 (1 ounce) package instant
sugar-free vanilla pudding mix (I used 2 packages of Jello brand sugar-free Cheesecake flavor)
1 teaspoon pumpkin pie spice
1 cup evaporated skim milk (I didn't use this)
1 cup skim milk (I used 2 cups of ultra pasturized skim milk- Simply Smart)
DIRECTIONS:
1. In a mixing bowl, combine the pumpkin puree, vanilla pudding mix, pumpkin pie spice, evaporated milk and skim milk. Blend together until smooth; place in parfait glasses and chill until set.

I guess I would make this recipe again because it is low in fat and sugar. But if I was really trying to make something luscious, I would continue my search!

How do you feel about sugar substitutes?

Sunday, November 05, 2006

Chocolate Harvest Cake- The recipe

Here it is, for all those who have waited so patiently!


Chocolate Harvest Cake
Better Homes & Gardens Magazine, November 2006

One-Bowl Cake:
1 cup buttermilk (I used fat-free)
1 cup water
2/3 cup cooking oil (I used canola oil and added 4 teaspoons extra to replace the egg yolks)
2 cups sugar (I used just a tad less)
2 eggs (I used 2 egg whites)
1 tsp. baking soda
1/2 tsp. salt
2 cups all purpose flour
3/4 cup un-sweetened cocoa powder (I used Droste)

Pumpkin Cream Filling:
1 8 Oz. package cream cheese, softened (I used neufchatel-which has 1/3 less fat)
1/3 cup canned pumpkin
1/4 cup sugar
1/4 tsp. ground cinnamon (I used a little more)

Chocolate Glaze:
1/2 cup whipping cream ( I used light cream, but wouldn't recommend it. It came out too thin and I had to thicken it)
4 oz. semisweet chocolate, chopped (I used semisweet morsels)

Cake Toppers:
Seedless red grapes,
whole blackberries or raspberries,
toasted hazelnuts, or shredded orange peel
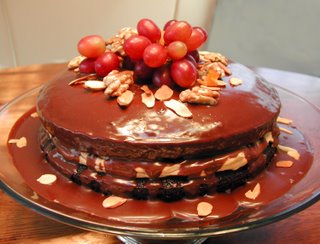
(I used red grapes, toasted walnuts and sliced almonds and candied orange peel

Prepare the oven and pans. Preheat oven to 350 degrees. Grease and flour two 9 x 1 1/2 inch round baking pans; set aside.

Combine ingredients. In an extra large bowl combine buttermilk, water, oil, sugar, eggs, baking soda, and slt. Using a large wire whisk, shisk until well combined. Add flour and cocoa powder; whisk vigorously until smooth. Divide batter between prpared pans.

Do the touch test. Bake for 30 to 35 minutes until top spring back when lightly touched in center. Cool in pans on a wite racck for 10 minutes. Remove from pans and cool completely.

Prepare Pumkin cream filling. In a medium bowl whisk together cream cheese, pumpkin, sugar and cinnamon until thickened. Place one cale layer on plate. Spread filling over top. Top with second cake layer.

Make the chocolate glaze. in a saucpan bring wipping cream just to boiling over medium-high heat. Remove from heat. Add chocolate (do not stir). Let stand 5 minutes. Stir until smooth. Cool 15 minutes or until slightly thickened. Pour over cake, allowing glaze to drip down sides. Chill until set, about 30 minutes. Top with desired toppers. Makes 14 servings.

Each slice: 431 cal, 23 g fat (8 g saturated), 60 mg chol, 254 mg sodium, 53 g carbs, 1 g fiber, 6 g pro, Daily Values: 26% vit. A, 1% vit. C, 10% calcium, 11% iron.

Thursday, November 02, 2006

Chocolate Harvest Cake!

Chocolate + Pumpkin = Harvest Success!

This recipe came from the new issue of Better Homes & Gardens Magazine. There were a lot of Thanksgiving food recipes, including a tweaked Pumpkin Pie that sounds really great. I, however, chose to make the Chocolate Harvest Cake.

I was a little leery at first, because I wasn't sure of the coupling of the two strong flavors of chocolate and pumpkin spice. But judging by the reaction of my family and friends who ate it, it was a huge success!

I don't have time right now to post the recipe, but if anyone is interested, let me know and I will add it on later.

Wednesday, November 01, 2006

Weeknight Whip-up!

Escarole & Beans
(also known as: Sa'roll N Beans in slang)


Like many other famous Italian entrees, this dish had a humble beginning. I've been told that the immigrants created this dish because it was fairly cheap to make and it would fill and warm you up at the same time.

This a pretty common Italian-American dinner, although I never ate it growing up, even though my mom is Italian. It is very popular in Rhode Island and the Italian-Americans often refer to it as Sa'roll N Beans.

It is one of the easiest dishes to make and so it is great for those busy work days when you don't have a lot of time to spend in the kitchen. I'm sure there are a lot of variations and opinions on how to make it, for example some people add diced baked ham. I add it sometimes, but here is my usual rendition!

P.S. the photo shows a lot more beans than I usually add and there is should be more liquid as well.

Escarole and Beans

1 bunch escarole, washed & chopped
2 garlic cloves, minced
3 tablespoons olive oil
1 can white cannelini beans, drained & rinsed
2 cups low-sodium chicken broth
3 tablespoons grated Parmigiano ( and/or the rind end of the cheese)
Crusty baguette for dipping

Bring a large pot of water to a boil, add salt and escarole and cook for about 10-12 minutes.
Drain and set aside. In a large skillet, on very low heat, add the olive oil and garlic. Let it heat for about 5 minutes to infuse the oil with the garlic flavor. Add the beans and escarole and heat for about 2-3 minutes. Add the chicken broth and (cheese rind if you have it) and cook on medium heat for about 5-10 minutes. Add the grated cheese, salt and pepper to taste.
Add more cheese if desired and enjoy with a slice of crusty bread!

How do you use escarole?

Tuesday, October 31, 2006

Happy Halloween!


Sorry I haven't been posting lately. I've been so busy at work and kind of pooped.

I didn't get many kids tonight so I've been eating all the candy! YIKES, I better stop and get myself on the treadmill tommorrow or they'll have to roll me into work in the morning!

I hope everyone had a great Halloween! (Hey put that Snickers down!)

Check in tommorrow for a healthy and quick weeknight dinner!

Thursday, October 26, 2006

Mom's Fish Dinner!

Baked Fish with Fennel, Onions and Potatoes
Not very photogenic, but the flavor shines through!


I don't really have an exact recipe to share with you because my mom just kind of throws this dish together. She saw it being made on a cooking show years ago and just makes it by memory- no exact measurements or ingredients for that matter. In fact, I'm not sure what kind of fish she used this time, but has used cod, scrod and haddack. I guess any white, fairly thick fish would do.

The first time she made this dish I was kind of leery. I couldn't imagine fennel and onions with fish and potatoes. But let me assure you, this is one of the tastiest fish dishes I have ever had. The onion and fennel flavors meld perfectly with the fish and potatoes.

I'll tell you as much as I know about the recipe.

The onion and fennel are sliced and sauteed in olive oil to start. The potatoes are partially cooked, sliced and added to the onion mixture.

The mixture is then added to a baking dish and the fish is placed on top and covered with lemon juice, breadcrumbs and I believe, melted butter. Then she tops it with a few lemon slices. It is baked in the oven (I'm not sure what temperature, maybe 350 degrees) for probably about 20 minutes.

How often do you use fennel?

Wednesday, October 25, 2006

Plenty of Apples...Not Plenty of time

Apple Pie without the hassle!

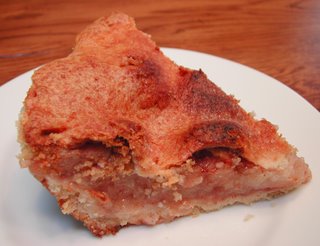
This weekend I was all about making an easy and delicious apple pie. I had a bag full of Macoun apples in the fridge that I have been eating daily with yogurt. But there was no way I was going to eat them all before they started to go bad.

I wanted to make a traditional apple pie with a crust, but I had limited time and I was getting tired, since it seems like all I did the entire weekend was cook.
So I decided to make an Apple Cobbler and I was not at all disappointed with the end result.
In fact, I was very pleased!


Easy Apple Cobbler


Ingredients

8-10 peeled and sliced Apples (I used Macoun)
1 tablespoon lemon juice
1/4 cup sugar
1 heaping teaspoon cinnamon
1/2 teaspoon apple pie spice
2 tablespoons tapioka

Topping
1 cup all-purpose flour
1/3 cup sugar
3/4 teaspoon baking powder
1/4 teaspoon salt
5 tablespoons butter or margarine (softened)
1 large egg and 1 egg white (beaten)
1 teaspoon vanilla extract

Preheat oven to 4oo degrees.

In a very large bowl, mix the apples and lemon juice. Add the sugar, cinnamon, apple pie spice and tapioka. Set aside for about 10 minutes.

To prepare topping, mix together flour, sugar, baking powder, salt, butter and eggs.
Grease a pie plate with butter or margarine and fill with the apple mixture. Spoon topping over fruit.

Bake cobbler until topping is lightly golden and apple mixture is bubbling, about 35-45 minutes. Transfer pie to a wire rack to cool slightly. Serve warm.

Have you ever made a cobbler?

Monday, October 23, 2006

And The Winner Is... Cinnamon!

Yummy Cinnamon Ricotta Roll Ups!

Yep, those are the Pillsbury refrigerated bread sticks that I couldn't decide what to do with. Thanks to all of your ideas, I finally made up my mind and decided to make these cute little roll-ups.

The inspiration for these roll ups came from a recipe on the Pillsbury website, in the Bake-Off Recipe Collection, called Apple Ricotta Brunch Biscuits. Other than the fact that it used Pillsbury Grands Buttermilk Biscuits, it called for most all of the other ingredients that I wanted to use for my roll-ups. So I modified the recipe a bit and the finished result was fantastic!

Cinnamon Ricotta Roll-Ups


1/4 cup sugar, plus 1/2 tsp. for topping (I cut the sugar in half, so if you like your cinnamon rolls sweet, use 1/2 cup)
1 cup part-skim ricotta cheese
1 egg
1/2 tsp. almond extract
1/4 cup sliced almonds
1/8 cup raisins
1/2 tsp. cinnamon
1 can Pillsbury Low-Fat Bread Sticks

Icing


Mix 2 heaping tablespoons of powdered sugar, 1/2 teaspoon water or milk and a couple of drops of almond extract; adding more liquid if needed, until the sugar is smooth enough to drizzle on top of the roll ups.

Directions

Heat oven to 375°F. Spray glass baking pan with nonstick cooking spray. In small bowl, combine 1/4 cup sugar, cheese, egg and almond extract; beat at high speed for 1 minute.

In small bowl, combine almonds, teaspoon sugar and cinnamon; mix well. Separate dough into 12 separate strips and flatten with a rolling pin. Spread about 2 teaspoons of the ricotta mixture and sprinkle about 5 or 6 raisins onto each dough strip. (You will have extra ricotta mixture, see note below for a great way to use it).

Roll up each strip and carefully place them into the prepared baking pan. (The mixture will be a little thin and some will leak out). Once all of the roll-ups are arranged in the pan, sprinkle the top with the almond, cinnamon and sugar mixture.

Bake at 375 degrees for about 19-20 minutes or until roll-ups are deep golden brown. Drizzle with icing if desired. Serve warm. Store in refrigerator.

I was pleasantly surprised with the final product. Because the cheese was so liquidy, it sort of melted into the dough as the roll-ups baked. This was not a bad thing. It gave the dough a nice rich and sweet taste. Although they were not too sweet, as I don't usually like very sweet things in the morning. I could have used cream cheese for a firmer and slightly tangy result, but I really wanted to use up my leftover ricotta.

Note: I actually had enough of the ricotta mixture left from this recipe to make a...
Mini Ricotta Cheese Cake!

I made a quick graham cracker crust with 3 graham crackers (crushed), 1 tablespoon of margarine/spread (softened) and 2 teaspoons sugar. I pressed it into the bottom of a mini spring pan and poured in the remaining ricotta mixture.

It baked at the same temperature as the roll-ups (375 for about 25-27 minutes, or until it was firm in the center.)

Melted seedless raspberry jam and toasted almond slices seemed like the perfect way to dress it up! I was in heaven.

I hope you try this recipe because I think you will love it.

Do you eat breakfast every morning? If so, is it something sweet or savory?

Friday, October 20, 2006

TGIF!!!!!

Question of the Day...

"What is the superstition surrounding taking the last piece of pie?"


A: "That it will bring good health, prosperity, and if the person is single, they will remain as such.
"

I heard this on the radio this morning and thought I would share it with all of you. I always thought it was supposed to be bad luck so I tried looking it up online and got some similar answers and a lot of other wacky superstitions as well.

On one website it said:

If you take the last piece of anything, you will be an old maid unless you kiss the cook.

Eat the point of a pie first and you will be an old maid.

Another website had these:

Spilling salt
Spilling salt means bad luck, having a quarrel.
In order to avoid the bad luck or to prevent quarrel, one has to throw but a pinch of salt that was spilled over the shoulder.
Explanation: In earlier times salt used to be rare, and thus expensive.
Country: BG, UA, BY, RO.

Raising a glass
When drinking, it is good to have a toast.
Explanation: Originally when toasting, wine or beer would flow from one into the other glass. This showed that the wine was not poisoned and that the guest had nothing to fear from the host.
Country: Europe, Asia.

Tell me some that you have heard...

Wednesday, October 18, 2006

Weeknight Whip-Up!

Fill Em Up and Chow Em Down!

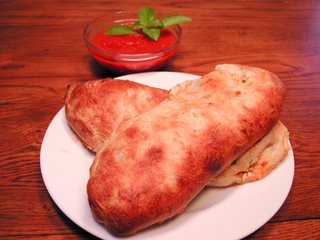
This was a quick way to make-over meatballs and sausage. With a can of Pilsbury Italian Loaf Bread in the fridge getting close to the expiration date, I was ready to create the perfect calzones. Or so I hoped.

There were plenty of fillings to choose from in my fridge to go with the meatballs and sausage but I narrowed it down to these: Ricotta Cheese, Mozzarella Cheese, Roasted Red Peppers, Red Onion, Black & Green Olives and Fresh Parsely and Basil.

I had never tried using canned dough for anything but what it was meant for, so it was kind of an experiment. I cut the dough into 4 equal pieces, formed circles and stretched it as much as I could without tearing it.

I sliced the meatballs, sausage, onion, olives and red peppers, piled the fillings on one side, leaving enough dough to fold over and then crimped the edges. I also added just a little tomato sauce to keep it moist. For a nice brown crust, I brushed the calzones with a little milk before putting them in a 450 degree oven. I baked them for about 20 minutes or until they looked light brown and crispy.

For garnish, I served the calzones with tomato sauce which made it nice for dipping.

All in all, I would have to give them a rating of "pretty damn good". For a store bought loaf bread, the crust was decent and the meatball and sausage filling was even better the second time around. I guess anything would taste better if it was covered in cheese, peppers, onions and olives!

I have another can Pilsbury Breadsticks in the fridge that is getting close to the expiration date. I was thinking about making something like cinnamon sticks.
Does Anyone Have Any Suggestions or Ideas?

Wordless Wednesday

Monday, October 16, 2006

Calling All Cooks...

Not As Easy As it Looks!

This weekend I had a little get together for Sunday dinner. I served Baked Rigatoni with Meatballs and Italian Sausage, along with some Italian Green Beans, Mixed Veggies and a Fresh Salad.

My neice and her husband were sweet enough to bring along some delicious goodies from Whole Foods... Shiraz Wine, Marinated Artichoke Hearts, Edam Loaf Cheese, Campo Montolbano Cheese, Thin Wafer Crackers, Mixed Olives, and an Artisan Loaf Bread. Everything was delicious! For dessert I had Marble Cupcakes with Butterscotch Chips and Butterscoth Frosting and my neice brought some Fresh Strawberries.

As soon as I saw the strawberries, I knew we had to melt some dark chocolate for dipping! Which brings me to my question...Why Did My Chocolate Seize?

I had a bag of Hershey's Dark Chocolate Chips, which we put into a glass bowl and microwaved on high for about 1 1/2 minutes, stirring half way through. The first attempt, my neice added a little cold water because the chocolate didn't seem to be liquid enough. It immediately seized.

I knew this would happen because the water was cold. The second time, I heated the chocolate the same way and it was fine but I thought I would try adding a little heated fat-free half & half to thin it a little. The same thing happened! Within 20 seconds the chocolate turned hard.

I don't understand why it happened with the warm half & half. I thought that is how Ganache was made. I have seen chefs on TV add a little cream to chocolate to thin it before pouring it over a cake or tart.

Oh well, the third time was the charm. We just melted the chocolate and used it as is. And being the resourceful women that we are, we made Bon Bons with the hardened chocolate! Let me tell you, they were delicious!!

What did I do wrong? Is it because I used "fat-free" half & half?

Thursday, October 12, 2006

Weeknight Whip-up!

Another Rotisserie Chicken Makeover
So Easy, So Quick...So Tasty!!


I would like to dedicate this post to Maltese Parakeet. A few posts back Maltese Parakeet suggested I change my name to Rotisserie Chicken Annie because it seems I have been eating a lot of it lately. Maybe she's right!

I love using rotisserie chicken in place of raw chicken when I'm in a hurry. There is no mess, less worry about raw chicken juices contaminating the kitchen, therefore less clean-up. Plus I don't particularly enjoy touching raw chicken. Don't get me wrong, some recipes just will not work unless you use fresh raw chicken, but when I'm looking for a quick, healthy and tastly meal; the rotisserie chicken always fills the bill. Hehehe! Pardon the pun!

Whenever I buy a rotisserie chicken, I never eat the whole thing in one meal. I usually end up with left over chicken from one of those birds almost every time. I could probably post a recipe every week on all the ways I use it as leftovers!

This week is no exception. I had a half of cooked breast left and felt like trying something different for a change. So the search began for some ideas online. I kind of felt like eating something with a little bit of tang and wanted to use broccoli and green beans in the mix. I found a recipe for Sesame Shrimp Stir Fry that used teriaki sauce, sesame seeds and sugar snap peas. Yum.

Voila, my inspiration for this week's rotisserie chicken makeover.

Sesame Chicken & Veggie Stir Fry

2 cups water and 1 cup uncooked white rice (or use microwave ready rice)
1 rotisserie chicken breast half, cut into bite size pieces
1/4 teaspoon ground ginger (or fresh grated ginger)
1/4 teaspoon cayenne pepper 1 clove garlic, minced (or 1 teaspoon of pre-chopped garlic)
1 tablespoon sesame seeds, plus 1 teaspoon more for topping
1/4 teaspoon ground black pepper 2 tablespoons sesame oil (or vegetable oil)
1 red bell pepper, sliced into thin strips (or1/4 cup jarred sliced roasted red pepper/pimentos)
1/2 small red onion, sliced (or 3 green onions, sliced)
3 tablespoons teriyaki sauce
1 1/2 cups broccoli florets & 1 1/2 cups green beans, steamed (or 1/2 pound sugar snap peas)
1/8 cup cornstarch
3/4 cup low sodium chicken broth
1/4 teaspoon salt, if necessary

DIRECTIONS

In a medium saucepan, bring salted water to a boil. Add rice, reduce heat, cover and simmer for 20 minutes. (I used Uncle Ben's Whole Grain Brown Ready Rice which cooks in 90 seconds in the microwave.)
While rice is simmering, combine chicken, ginger, cayenne pepper, garlic, 1 tablespoon sesame seeds and black pepper in a large bowl.
Heat a large wok or skillet and add the remaining teaspoon of sesame seeds. Watch carefully stirring often until light brown. Remove the seeds and set aside. Add the oil to the skillet. Add red bell pepper, onions and garlic; saute 3 to 4 minutes to soften slightly. Add teriyaki sauce. Add steamed broccoli, green beans and chicken with seasoning; saute 4 minutes or until everything is heated through. Stir cornstarch into chicken broth and add to wok; cook, stirring until mixture boils. Sprinkle with salt. Spoon chicken mixture over rice. Sprinkle with extra toasted sesame seeds.

This was one of the best left over dishes I've made yet. Maybe it is because I haven't had teriaki in a long time, but believe me it was good.

How often do you buy rotisserie chicken?

Wednesday, October 11, 2006

Tuesday, October 10, 2006

Tuesday Trivia

Q: Pepperoni is America’s favorite pizza topping.

Is Japan’s favorite pizza topping:

(a) eggs; (b) pickled ginger; or (c) squid?


A: Squid. Australians prefer eggs; pickled ginger is #1 in India. The French like fresh cream.
source: http://halife.com/trivia/food.html

What is your favorite pizza topping?

Monday, October 09, 2006

Guilt Free Baked Pasta

Reduced-Fat Manicotti
(and you'd never know it!)

It is "Flavors of Italy" week at my local IGA, so all my favorite Italian foods are on Sale!! And you know how I love a Sale!

I picked up some broccoli rabe, fresh Italian parsely, a red onion, garlic, proscuitto and ricotta. I really didn't have any particular recipe in mind while I was shopping, but as I stood in line at the register to pay, I thought about what I was going to make. The first thing that came to my mind was a baked pasta dish. But I didn't want anything too filling or fattening... So what kind?

When I got home, I went online and searched for a recipe with the above specified ingredients and came up with a couple for canneloni. I knew I didn't have canneloni (even in my overcrowded 'pasta' pantry closet). But I did have manicotti. This would do.

My inspiration came from a recipe on Epicurious for Spinach and Cheese Canelloni. I didn't use the sauce from that recipe though, I made a bechamel sauce adapted from Giada DI Laurentiis. Although I'm sure she would not approve, because I substituted fat-free half and half for the whole milk and used some smart balance spread in place of some of the butter.
This what I came up with.

Broccoli Rabe and Cheese Manicotti
Adapted from Gourmet -March 2003 "Spinach and Cheese Canelloni"
Makes 10 Manicotti


Low-Fat Bechamel Sauce
1 1/2 tablespoons unsalted butter, 1 tablespoon smart balance spread
1/4 cup all-purpose flour
2 cups fat-free half and half (warmed up in the microwave)
Pinch freshly grated nutmeg
Pinch cayenne pepper
Salt and pepper


For manicotti
3 tablespoons extra-virgin olive oil
1/4 of a large red onion, chopped
2 garlic cloves, finely chopped
One large bunch of broccoli rabe, washed, trimmed, blanched and chopped
Half of a 15 oz container part-skim ricotta (I used Supreme, which is my favorite)
1 large egg, lightly beaten
1/4 cup chopped fresh flat-leaf parsley, plus more for garnish
3 slices of prosciutto (sliced a little thicker than usual), chopped
salt
black pepper
1/2 cup finely grated Pecorino Romano or Parmigiano-Reggiano (I used Parmigiano)
10 manicotti pasta

Special equipment: a 13- by 9- by 2-inch ceramic baking dish or other shallow 3-qt flameproof baking dish (not glass). *I used glass. Just cover all of the exposed top edges with foil before placing under the broiler.

Make bechamel sauce:
In a medium pot, melt the butter and spread over medium heat. When completely melted, add the flour and whisk until smooth, about 2 minutes. Gradually add the milk, whisking constantly to prevent any lumps from forming. Continue to simmer and whisk over medium heat until the sauce is thick, smooth and creamy, about 10 minutes. The sauce should be thick enough to coat the back of wooden spoon. Remove from heat and add the nutmeg and chayenne pepper. Stir until well combined and check for seasoning. Set aside.

Make manicotti:
Place oil, onion and garlic in a 5- to 6-quart heavy pot over low heat, allowing onion and garlic to heat up slowly in the oil, then sauté, stirring occasionally, until lightly browned, about 5 minutes. Add broccoli rabe and sauté, stirring, until just wilted, about 3 minutes. Remove from heat and cool completely. (At this point I put the broccoli rabe mixture in the food processor to ensure a smooth texture when mixed with the cheese. You could skip this step if the texture doesn't bother you.)

Stir together ricotta, egg, parsley, prosciutto, salt, pepper, and 1/3 cup cheese in a bowl, then stir in broccoli rabe mixture.

Boil pasta in a 6- to 8-quart pot of boiling salted water, stirring to separate, until just tender, about 6 minutes. Drain and gently transfer to kitchen towels (not terry cloth).

Preheat oven to 425°F.

Spread 2/3 cup sauce in greased baking dish. Gently stuff ricotta filling into each manicotti dividing evenly for all 10. If some tear, just fill them and overlap the seams on the bottom. Transfer, seam side down, to baking dish. Arrange snugly in 1 layer. Spread 1/2 cup more sauce over manicotti and sprinkle with remaining cheese. Bake, covered with foil, in middle of oven until sauce is bubbling, about 20 minutes.

Turn on broiler.

Remove foil and broil cannelloni about 5 inches from heat until lightly browned, 2 to 4 minutes. Let stand 5 minutes before serving. Reheat remaining sauce and serve on the side. Sprinkle with fresh Italian parsely.

Note:
• Manicottii can be assembled (but not baked) 1 day ahead and chilled, covered with plastic wrap. Let stand at room temperature 15 minutes before baking. Remaining sauce will need to be thinned slightly.

This recipe did take some time in the kitchen, but I made it a day ahead so that it would be easy to heat and serve. I really enjoyed the flavors in this dish. Everything mingled nicely together. Also, the white sauce was a nice change from the usual marinara and it wasn't too heavy because it was low-fat.

Have you ever used fat-free half and half in any your recipes?

Tuesday, October 03, 2006

More Scents of Autumn!

The Quintessential Fall Cookie
(At least in my book)

When I think of a Hermit cookie several thoughts come to mind. I imagine cool weather, colorful foliage, and spicy flavors.

I don't think of anti-social people secluded in the deep woods. So I can't imagine why these cookies are called Hermits.


The dictionary'
s definition of a hermit is:

  1. A person who has withdrawn from society and lives a solitary existence; a recluse.
  2. A spiced cookie made with molasses, raisins, and nuts.
Quite a contrast in comparisons, isn't it?

O.k. enough about that and on with the recipe. Actually, I don't know where this recipe came from. I cut it out of the newspaper years ago and there was no credit given for the author. I included the recipe exactually as written and included my changes in red.

I decided to make them lower in fat by changing some of the ingredients, but I have to tell you that I did have a few problems with the baking time. I'm not sure if it has to do with the different ingredients or the recipe in general. In the end though, they did turn out good!


"Reduced-Fat" Hermits

1 cup sugar ( I used 3/4 cup)
1/4 cup butter (I used 2 Tablespoons Smart Balance Spread)
1/4 cup lard (I used 1/3 cup Dried Plum Puree, aka:Prune Puree)
3 cups sifted flour (I used 2 cups A.P Flour. and 1 cup WW Pastry Flour )
1 tsp.ground cloves
1 tsp. cinnamon
1/2 tsp. nutmeg
1/4 tsp. ginger
1/2 tsp. salt
1 tsp. baking soda
1/2 cup molasses
1/2 cup buttermilk or sour milk (I used fat-free buttermilk)
1egg, beaten (I used 2 egg whites)
1/2 cup raisins

Preheat oven to 350 degrees.

In a large bowl, cream together the sugar and butter-lard combination.( I creamed together the sugar and the spread, then added in the puree.) In another large bowl, sift together the flour, the spices, salt and baking soda.

Combine the wet and dry ingredients alternately with the molasses and milk. Add the beaten egg and raisins. Mix well.

Spread mixture on a greased baking sheet so that it is about 1/2 inch thick.( I did this free form in a cookie sheet on parment paper. The dough did not touch the sides of the pan.) Bake for 10 to 12 minutes. Be careful not to overbake the cookies. (After 12 minutes my cookies were still raw in the middle, so I left them in for another 10 minutes.)

When they are firm to the touch, they are done. Cut into oblong cookie shapes. If desired, you can sprinkle confectioners’ sugar over the tops of the cookies while they are still warm.
Note: You can substitute Crisco or another shortening for the lard. Also, you can use 1/2 cup brown sugar and 1/2 cup granulated sugar, and you can add 1 tsp. ginger and 1 cup of chopped walnuts, if desired. Makes 24 hermits.

Does Anyone Know Why Are They Called "Hermits"?

Weeknight Whip-up!

Couscous with Chicken and Vegetables

Nothing is easier to cook than couscous. In fact, you really don't even cook it. Boil the water or broth, take the pan off the heat, add the couscous and cover. Let it sit for 5 minutes and fluff with a fork. It can't get much simplier than that!

It makes a great accompaniment to leftovers. In my case, I had leftover steamed mixed vegetables and store bought rotisserie chicken.

To jazz it up a bit, I sauted some red onion and garlic in extra virgin olive oil, added the veggies and a little garlic powder.

Then I added a little Wondra flour, stirred it into the oil and cooked it a bit. Next, fresh squeezed lemon juice, low-sodium chicken broth and small pieces of the leftover chicken breast. I covered the pan and let it slowly simmer.

Once everything was heated through, I added just a dash of white wine vinegar for a little tangyness. And for some freshness, I added chopped fresh parsely and basil. To top it all off, I sprinkled on a little feta cheese and spooned it over the couscous.

Easy and satisfying for a mid-week meal!

How often do you eat Couscous?

Tuesday Trivia

EVERYONE LOVES COKE!

Q: How many Coca-Colas will be consumed worldwide during the next hour:
(a) 17-million; (b) 27-million; or (c) 37-million?


A:
About 27-million. That's over 600-million per day.
source: http://halife.com/trivia/food.html

How often do you drink soda? What is your favorite?