Sunday, November 26, 2006

The Perfect Gift!

The Forbidden Fruit Just Got a Bit More Sinful

These treats are the apple of my eye. Yum! They are fairly easy to make. They just take a little time and patience. But the end result is definitely worth it.

I found many recipes online for these apples, and after reading through all of them, I mixed and matched a few to create my own. I used the recipe on the Kraft Caramels for the caramel coating step and I found some helpful hints from Starchefs and Fabulous Foods online.

Chocolate & Caramel Covered Apples
5-6 medium apples (Granny Smith or 3-4 large Mutzu if available)
Heavy wooden sticks

1 bag (14 oz.) KRAFT Caramels
2 Tbsp. water
12 ozs. good-quality chocolate (milk, semisweet, or a combination), chopped
1-1/2 tsp. solid vegetable shortening (or vegetable oil)
About 1 c. chopped nuts (walnuts, peacans or almond slices)
About 1/2 c. shredded coconut
About 1/4 c. mini chocolate chips or peanut butter chips
About 1/4 c. Craisins or chopped dried cherries
Candy Sprinkles
White chocolate for drizzling


Wash and dry apples well, and keep at room temperature for at least 30 minutes. Prepare a pan by lining the bottom with parchment paper cut to fit (DO NOT use wax paper or foil). If you don't have parchment paper, line the pan bottom with several layers of plastic wrap. The pan should be able to accommodate all apples without them touching.

INSERT 1 wooden pop stick into stem end of each apple; set aside.
PLACE caramels in medium saucepan. Add water; cook on medium-low heat until caramels are completely melted and mixture is well blended, stirring constantly.
DIP apples in caramel mixture, coating evenly, use a spoon to help you cover the top part of the apple. With the knife, scrape off any extra caramel from the bottom
of the apple.
Immediately roll dipped apples in coconut. Place on parchment lined pan.

PLACE the apples in the refrigerator to chill for 30 to 60 minutes so that the caramel can set up.

In medium heatproof bowl, place chopped chocolate of choice and shortening. Place bowl over hot simmering water on low heat, and stir often until melted. Remove from heat and hot water; stir until smooth.

Tear off a sheet of wax paper about one foot long. Place on your work surface. Place the chopped nuts, chocolate chips, craisins and sprinkles in a mound on the wax paper.

Remove the apples from the refrigerator.
Dip the bottom of the caramel apple in chocolate. Use a spoon to drizzle melted chocolate over the top, completely encasing the apple in chocolate. Place the chocolate-covered apple into the nuts, craisins and chocolate chips; gently pat into the apple up the sides to about the widest point of the apple. You may have to place some of the trimmings on one piece at a time if you want a neat, professional look. Place on parchment-lined pan.
If using white chocolate as well, drizzle over the apples and then add candy sprinkles, if desired.

Allow chocolate to set, before wrapping in cellophane or plastic wrap. Refrigerate for up to 2 days.

These apples make a great first impression and a lasting impression once eaten. They are delicious. Why spend $15-$20 bucks for one, when you can make your own. It's fun and creative. You can use any coatings or chocolate that you like. And best of all they make a great gift!

Do you make and give holiday food gifts?


Friday, November 24, 2006

The Feast is Over!

I Was Thankful for A Bountiful Table

Thanksgiving. A time for family, giving and thankfulness. I love this Holiday!
This year my sister was the hostess and I was responsible for the rolls and mashed potatoes.
The dinner was great and the day relaxing. What more could you ask for in a holiday?

Mashed Potatoes

3 pounds Yukon Gold potatoes, peeled and cut in quarters
3/4 to 1 cup warm milk
5-6 tablespoons unsalted butter, softened
1 bay leaf
1 tablespoon Salt
Pepper to taste


Place potatoes in a medium pot and cover with cold water.
Bring to a boil, heat to a simmer. Add the tablespoon of salt and continue to simmer until potatoes are fork tender, about 15-20 minutes. When potatoes are done, drain and return potatoes to pot to dry slightly. Mash potatoes in the pot with a potato masher. Remove and discard bay leaf. Add warm milk to potatoes, over heat, mix with electric mixer until smooth. Add butter and heat until finely textured and fluffy.

This was a mix of different recipes, some of which I found online. One by Sara Mouton, one by Tyler Florence and my own. They turned out fine and everyone seemed to like them.

How Did Your Day Go?

Monday, November 20, 2006

Keeping It Simple!

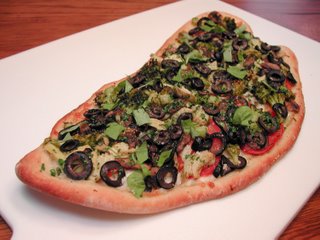
Free-Stlye Veggie Pizza

With Thanksgiving quickly approaching, I have been cooking very little lately.

Left-over mixed vegetables, half of a salad tomato, mozzarella cheese, pecorino cheese and store bought pizza dough, made for a delicious and very quick dinner. I added a little Italian seasoning, olive oil and topped it with fresh basil just before serving.

I only used half of the pizza dough and used the other half to make another pizza crust which I pre-baked and froze for future use! I guess that's why the shape is kind of oblong, because I cut the dough in half and somehow couldn't get a perfect circle. I kind of like this shape though, it seems more casual and homemade.

The only problem I ran into was half way through cooking the crust, it blew up like a balloon and I had to pierce it. I'm glad I checked on it or I would have had a hollow ball of bread instead of a pizza crust!

I just heard on the food network that pizza(take-out) is the most popular dinner on the night before Thanksgiving. Of course it is, no one in their right mind is going to cook dinner with all of the work they have preparing the Thanksgiving meal.

What are you having for dinner Wednesday night?


Sunday, November 19, 2006

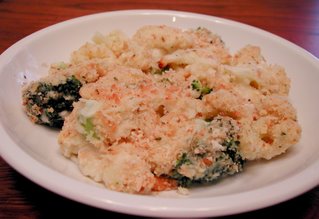
Cheesy Broccoli & Cauliflower

I love broccoli!

I love that I love broccoli, since it is so good for you! Broccoli and cauliflower are known as cruciferous vegetables because they contain compounds that may help prevent cancer.

Broccoli is a member of the cabbage family and is closely related to cauliflower. I was suprised to read on the World's Most Healtiest Foods Website that it's origin began in Italy!

The health benefits are many, ranging from:
* Supporting Stomach Health
* Optimizing Your Cells' Detoxification & Cleansing Ability
*
Help for Sun-Damaged Skin
*
Cardio-Protectiion
*
Cataract Prevention
* Stronger Bones
* Immune System Booster
* Birth Defect Fighter

Another important thing I learned is that the best way to cook broccoli or other cruciferous vegetables is to steam them. Actually, I already knew this but I didn't realize how many nutrients are lost when microwaving or boiling.

I always thought microwaving vegetables was a good way to keep the nutrients, but I was wrong. According to this website "microwaving broccoli resulted in a loss of 97%, 74% and 87% of its three major antioxidant compounds-flavonoids, sinapics and caffeoyl-quinic derivatives. In comparison, steaming broccoli resulted in a loss of only 11%, 0% and 8%, respectively, of the same antioxidants."

Facinating, isn't it? I guess I will be steaming more often!

This is a great post for Sweetnicks ARF/5-a-day Tuesday evening round-up. Go check it out!

Here is an easy and healty way to enjoy these two vegetables:

Cheesy Broccoli and Cauliflower
(Original recipe was Cheesy Cauliflower cut from the newspaper-I didn't notice the author)


1/2 small head of cauliflower & 1 small head of broccoli
or one 16-20 ounce bag of frozen cauliflower and broccoli florets
3/4 cup 1 percent lowfat milk (I used Simply Smart fat-free milk)
1 tablespoon all-purpose flour
1/2 teaspoon Dijon mustard
1/8 teaspoon garlic powder
3/4 cup shredded reduced fat Cheddar cheese (I used 2% milk Cracker Barrel cheddar)
2 tablespoons grated Parmesan cheese (I used Pecorino Romano)
2 tablespoons dried seasoned bread crumbs

Steam the cauliflower and broccoli for around 8-10 minutes, until tender. Set aside.

While the vegetables are cooking, whisk together the milk, flour, mustard, and garlic powder om a small saucepan until well blended. Place over medium-high heat and bring to a simmer, stirring until the mixture thickens slightly, about 2 minutes.

Stir in the cheddar and parmesan cheese until melted. Preheat broiler on high.

Arrange the vegetables in a baking pan and pour the cheese sauce evenly over the top. Sprinkle with the breadcrumbs and broil until the crumbs turn golden brown, about 2 minutes.

Prep. time: 5 minutes
Cooking time: 15 minutes
Calories 140, fat 20 g, saturated 1g, sodium 80mg, carbs. 21g, fiber 2g, protein 9g.

I liked this recipe because it was a
healtly and guilt-free way to enjoy a cheesy side dish. With the holidays quickly approaching, I think we could all benefit from a recipe like this. No?

Speaking of the holiday, we are going to my sisters house this year and I am responsible for the mashed potatoes and dinner rolls. I got away easy, huh?
I was going to make a potato pie with parmigiano cheese but my sis doesn't think it will go well with the turkey and gravy. So I'm making basic mashed potatoes.

Does anyone have a tried and true mashed potato recipe or any ideas on which rolls to bring for a traditional turkey dinner?

Thursday, November 16, 2006

To satisfy my sweet tooth!

Because I Just Had To Have Dessert!

I'm trying to be good lately. Especially with the Holidays coming up. So I whipped a something quick.

Just a Bartlet Pear with sliced Dried Plums and Walnuts Sauteed in Butter with a Honey, Cinnamon and Maple Syrup Glaze!

So What Are You Having For Dessert??

Tuesday, November 14, 2006

Italian Wedding Soup - Recipe Make-Over

Follow a recipe or trust your instincts?

Of course, now I say trust your instincts, but for some reason when I made this soup the first time I followed the recipe. Big mistake!

Sometimes when you read through a recipe you notice a few things that you would do differently, from experience or somtimes just instinct. Well in the case of this soup, I knew that I should cook the escarole separately and add it in when ready to serve. But, the recipe said to cook it in the broth, so I did and it was a disaster. The escarole turned the soup into a swampy dark green color and it didn't smell right either.

Let me first say, however, that I planned on making the soup the night before and serving it the next day. I guess if you were to make the soup and eat it all that day it might be ok. But for me, the idea of making soup appeals to me because I look forward to eating it for a few days after making it.

So I would never add the escarole in the pot unless I knew it was all going to be gone that same day. I actually save the escarole and pasta in separate containers and add them to the soup bowl before laddling in the soup. This way the broth says nice and bright and the pasta doesn't get too mushy either!

The original recipe also added onions and an egg/cheese mixture which is traditional to this soup. I chose not to add either. I don't think the soup keeps as long in the refrigerator when onions are added and I don't really care too much for the egg mixture.

I'm posting the recipe with my changes. The original recipe was printed in my local newspaper years ago and it was from Vaccaro's Trattoria in Ohio.

Italian Wedding Soup

Meatballs (My own recipe)
1 lb. Ground Beef (I used Cerified Angus Ground Beef 10% fat)
2 eggs
2 slices stale Italian bread or sliced white bread, crusted removed
4 tbls. milk
2 cloves garlic, minced
1/4 cup fresh parsley, minced
8-10 fresh basil leaves, minced
3/4 cup grated Pecorino Romano cheese

In a small bowl, soak the bread in the milk. Combine all ingredients except ground beef in a large bowl and mix well. Add in beef and gently work the mixture with your hands until evenly combined. Do not overmix.

Roll the meat into grape size balls. Place on a parchment lined or lightly greased foil lined baking sheet (with sides).

Bake in a 350 degree oven for 10-12 minutes, turning half way through. At this point, the meatballs may be cooled and refrigerated or frozen until ready to use.

Soup
3 quarts reduced sodium chicken broth (I used Swanson)
1/2 cup chopped carrots
3/4 cup chopped celery
4-5 cups chopped escarole
2 cups tiny meatballs
2 cups cooked chicken, shredded or diced
1 cup of any very small pasta (I used pastina-stars)
Freshly ground pepper to taste
1 bay leave
Grated Pecorino Romano cheese

Cook escarole in boiling water for around 15 minutes. Drain and set aside. Cook pasta in a separate pot until al dente. Drain and set aside.

Measure all ingredients and place them in bowls on the counter.
Bring broth to a simmer in a large soup pot. Add carrots, celery, bay leave, meatballs and chicken. Simmer uncovered for around 30 minutes, until the carrots are tender. Season with ground pepper.

Portion out the escarole and pasta in the soup bowls. Laddle the soup in each bowl and sprinkle with a generous amount of Pecorino Romano cheese. Serve immediately with crusty Italian bread. Remember to remove bay leave and discard.


I really enjoyed this soup! The only thing I might try next time is to add in a little onion powder since I omitted the onions. I'm not sure if it would make a difference but I'll give it a try.

Do you follow recipes or follow your instincts?

Sunday, November 12, 2006

Boxed Cake Mix and Canned Frosting...Yummy!

Pillsbury Funfetti Cake and Betty Crocker Vanilla Frosting
"Everyone's Favorite?"

Today is my friend Jen's birthday. (Happy Birthday Jen!!...pssst-"You're Old" Hahahahha!)
She is the creator and host of Casual Slack which boasts many dedicated readers of her daily nonsense. I mean this in a good way. She works hard to make the sometimes mundane week, exciting and funny! Check it out-but beware parental guidance is recommended. ;)

So on to the cake. Funfetti cake is Jen's favorite cake, as well as my neice's. As a matter of fact it seems like everyone likes this cake. I have to admit I never really thought I would like it. Why? First of all because it is not chocolate and it just seems kind of juvenile. I mean with all the sugar and colored sprinkles in it.

But it seems like every time I make it, I say to myself I'm not going to eat a piece and somehow it calls to me. I end up eating it and liking it. I guess it just brings out the kid in all of us!

I just found this recipe for Funfetti Cookies. It got some really great reviews. I guess I'll have to give it a try.
Even better, why don't you make them and let me know what you think!

Friday, November 10, 2006

Crunchy Parmesan Chicken

Terrible Photo-Great Recipe!

I saw this recipe on Everyday Italian on the Food Network. I generally like Giada's recipes, so when I saw her making this one, I had to give it a try.

As usual, I loved it. I didn't use chicken tenders however, I used chicken cutlets. I turned out great anyway. I especially loved the vinegarette dipping sauce. It was actually thick and creamy and very tasty.

Crunchy Parmesan Chicken

Recipe courtesy Giada De Laurentiis

4 tablespoons plus 1/2 cup extra-virgin olive oil
1 cup buttermilk
1 1/2 pounds chicken tenders (about 18)
3 large garlic cloves, minced
1/2 teaspoon salt
3 tablespoons balsamic vinegar
Freshly ground black pepper
1 1/4 cups freshly grated Parmesan
3/4 cup Italian-style seasoned bread crumbs


Preheat the oven to 500 degrees F.

Brush 1 tablespoon of oil over each of 2 heavy large lined baking sheets. Place the buttermilk in a large bowl. Add the chicken tenders and stir to coat. Let stand at least 15 minutes and up to 30 minutes.

Meanwhile, mash the garlic with the salt in a medium bowl. Whisk in the vinegar and then the remaining 1/2 cup of oil. Season the vinaigrette, to taste, with pepper. Transfer the vinaigrette to a small serving bowl.

Stir the Parmesan and bread crumbs in a pie dish. Remove the chicken tenders from the buttermilk and dredge them in the bread crumb mixture to coat completely, pressing to adhere. Arrange the coated chicken tenders on the prepared baking sheets, spacing evenly. Drizzle the remaining 2 tablespoons of oil over the chicken tenders and bake until they are cooked through and golden brown, about 12 minutes.

Transfer the chicken tenders to a platter and serve the vinaigrette alongside for dipping.

I guess the dipping sauce was the key to this recipe. When ever I make oven fried chicken, it always seems dry. I always end up covering it with tomato sauce for that reason. In this case the chicken didn't seem dry to begin with, but the dipping sauce gave it a kick and made it seem even more tender and juicy.


Wednesday, November 08, 2006

Gingerbread Biscotti

Just Practising For The Holidays!

I found this biscotti recipe on allrecipes.com. I've been craving biscotti for the last few weeks and finally gave into my temptation. I didn't feel too bad about this recipe though, since it is kind of on the healthy side. Hey, it does have whole wheat flour in it and I reduced the sugar a bit. Also, the ginger and other spices are known to help with digestion. So if eaten as an after dinner cookie, it could be considered a healthy digestive!


Gingerbread Biscotti
INGREDIENTS:
1/3 cup vegetable oil, (I used canola oil)
1 cup white sugar (I used 3/4 cup)
3 eggs
1/4 cup molasses
2 1/4 cups all-purpose flour
1 cup whole wheat flour
1 tablespoon baking powder
1 1/2 tablespoons ground (I used 1 Tablespoon)
ginger
3/4 tablespoon ground
cinnamon
1/2 tablespoon ground cloves
1/4 teaspoon ground nutmeg
I also added:
1/2 cup crystalized ginger
1/2 cup toasted chopped walnuts
1/2 cup raisins
DIRECTIONS:
1. Preheat the oven to 375 degrees F (190 degrees C). Grease a cookie sheet. (I used parchment paper).
2. In a large bowl, mix together oil, sugar, eggs, and molasses. In another bowl, combine flours, baking powder, ginger, cinnamon, cloves, and nutmeg; mix into egg mixture to form a stiff dough.
3. Divide dough in half, and shape each half into a roll the length of the cookie. Place rolls on cookie sheet,(I used 2 cookie sheets) and pat down to flatten the dough to 1/2 inch thickness.
4. Bake in preheated oven for 25 minutes (I baked them 20 minutes). Remove from oven, and set aside to cool.
5. When cool enough to touch, cut into 1/2 inch thick diagonal slices. Place sliced biscotti on cookie sheet, and bake an additional 5 to 7 minutes on each side, (I did 4 minutes on one side and 2 minutes on the other) or until toasted and crispy.

These cookies are very spicy and have a little bit of a kick. I enjoyed them and they freeze really well too. I may add them to my holiday cookie line-up!

Are you thinking about holiday recipes yet?

Monday, November 06, 2006

Pumpkin Parfait

Good- But Could Be Better!
(in my never to be humble opinion)

I had some leftover pumpkin from my Chocolate Harvest Cake and hated to throw it away, so I searched high and low for a pudding recipe to use it up. I found this recipe on all recipes.com. I wanted something quick, easy and light; this one fit the bill.

I think I would have preferred a cooked pudding with a richer flavor, since I thought this had a bit of any after taste from the sugar substitute. But two of my friends from work absolutely loved this pudding as is. So I guess it is worth posting.

Note: After reading some of the reviews on this recipe, I followed the advise from two people who tried it and used 2 packages of instant pudding.

Pumpkin Parfait
INGREDIENTS:
1 cup pumpkin puree
1 (1 ounce) package instant
sugar-free vanilla pudding mix (I used 2 packages of Jello brand sugar-free Cheesecake flavor)
1 teaspoon pumpkin pie spice
1 cup evaporated skim milk (I didn't use this)
1 cup skim milk (I used 2 cups of ultra pasturized skim milk- Simply Smart)
DIRECTIONS:
1. In a mixing bowl, combine the pumpkin puree, vanilla pudding mix, pumpkin pie spice, evaporated milk and skim milk. Blend together until smooth; place in parfait glasses and chill until set.

I guess I would make this recipe again because it is low in fat and sugar. But if I was really trying to make something luscious, I would continue my search!

How do you feel about sugar substitutes?

Sunday, November 05, 2006

Chocolate Harvest Cake- The recipe

Here it is, for all those who have waited so patiently!


Chocolate Harvest Cake
Better Homes & Gardens Magazine, November 2006

One-Bowl Cake:
1 cup buttermilk (I used fat-free)
1 cup water
2/3 cup cooking oil (I used canola oil and added 4 teaspoons extra to replace the egg yolks)
2 cups sugar (I used just a tad less)
2 eggs (I used 2 egg whites)
1 tsp. baking soda
1/2 tsp. salt
2 cups all purpose flour
3/4 cup un-sweetened cocoa powder (I used Droste)

Pumpkin Cream Filling:
1 8 Oz. package cream cheese, softened (I used neufchatel-which has 1/3 less fat)
1/3 cup canned pumpkin
1/4 cup sugar
1/4 tsp. ground cinnamon (I used a little more)

Chocolate Glaze:
1/2 cup whipping cream ( I used light cream, but wouldn't recommend it. It came out too thin and I had to thicken it)
4 oz. semisweet chocolate, chopped (I used semisweet morsels)

Cake Toppers:
Seedless red grapes,
whole blackberries or raspberries,
toasted hazelnuts, or shredded orange peel
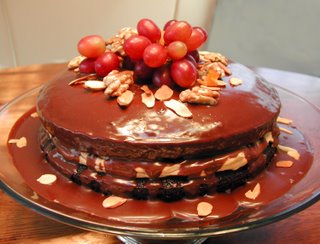
(I used red grapes, toasted walnuts and sliced almonds and candied orange peel

Prepare the oven and pans. Preheat oven to 350 degrees. Grease and flour two 9 x 1 1/2 inch round baking pans; set aside.

Combine ingredients. In an extra large bowl combine buttermilk, water, oil, sugar, eggs, baking soda, and slt. Using a large wire whisk, shisk until well combined. Add flour and cocoa powder; whisk vigorously until smooth. Divide batter between prpared pans.

Do the touch test. Bake for 30 to 35 minutes until top spring back when lightly touched in center. Cool in pans on a wite racck for 10 minutes. Remove from pans and cool completely.

Prepare Pumkin cream filling. In a medium bowl whisk together cream cheese, pumpkin, sugar and cinnamon until thickened. Place one cale layer on plate. Spread filling over top. Top with second cake layer.

Make the chocolate glaze. in a saucpan bring wipping cream just to boiling over medium-high heat. Remove from heat. Add chocolate (do not stir). Let stand 5 minutes. Stir until smooth. Cool 15 minutes or until slightly thickened. Pour over cake, allowing glaze to drip down sides. Chill until set, about 30 minutes. Top with desired toppers. Makes 14 servings.

Each slice: 431 cal, 23 g fat (8 g saturated), 60 mg chol, 254 mg sodium, 53 g carbs, 1 g fiber, 6 g pro, Daily Values: 26% vit. A, 1% vit. C, 10% calcium, 11% iron.

Thursday, November 02, 2006

Chocolate Harvest Cake!

Chocolate + Pumpkin = Harvest Success!

This recipe came from the new issue of Better Homes & Gardens Magazine. There were a lot of Thanksgiving food recipes, including a tweaked Pumpkin Pie that sounds really great. I, however, chose to make the Chocolate Harvest Cake.

I was a little leery at first, because I wasn't sure of the coupling of the two strong flavors of chocolate and pumpkin spice. But judging by the reaction of my family and friends who ate it, it was a huge success!

I don't have time right now to post the recipe, but if anyone is interested, let me know and I will add it on later.

Wednesday, November 01, 2006

Weeknight Whip-up!

Escarole & Beans
(also known as: Sa'roll N Beans in slang)


Like many other famous Italian entrees, this dish had a humble beginning. I've been told that the immigrants created this dish because it was fairly cheap to make and it would fill and warm you up at the same time.

This a pretty common Italian-American dinner, although I never ate it growing up, even though my mom is Italian. It is very popular in Rhode Island and the Italian-Americans often refer to it as Sa'roll N Beans.

It is one of the easiest dishes to make and so it is great for those busy work days when you don't have a lot of time to spend in the kitchen. I'm sure there are a lot of variations and opinions on how to make it, for example some people add diced baked ham. I add it sometimes, but here is my usual rendition!

P.S. the photo shows a lot more beans than I usually add and there is should be more liquid as well.

Escarole and Beans

1 bunch escarole, washed & chopped
2 garlic cloves, minced
3 tablespoons olive oil
1 can white cannelini beans, drained & rinsed
2 cups low-sodium chicken broth
3 tablespoons grated Parmigiano ( and/or the rind end of the cheese)
Crusty baguette for dipping

Bring a large pot of water to a boil, add salt and escarole and cook for about 10-12 minutes.
Drain and set aside. In a large skillet, on very low heat, add the olive oil and garlic. Let it heat for about 5 minutes to infuse the oil with the garlic flavor. Add the beans and escarole and heat for about 2-3 minutes. Add the chicken broth and (cheese rind if you have it) and cook on medium heat for about 5-10 minutes. Add the grated cheese, salt and pepper to taste.
Add more cheese if desired and enjoy with a slice of crusty bread!

How do you use escarole?